Audio Mastering Tutorial: Get Expert Results in Any DAW
Last Edited: May 27, 2026
You put in weeks crafting the perfect mix, only to hear it fall flat the moment it hits a streaming platform or a club system. That gap between a great mix and a polished, professional master trip up even experienced producers. The truth is, mastering is not just about making things louder. It is a precise, methodical process that requires the right tools, the right targets, and the discipline to stay objective. This tutorial walks you through every stage of a reliable DAW-based mastering workflow, from setting up headroom to verifying streaming compatibility, so your music hits exactly the way you intended.
Key Takeaways
| Point | Details |
|---|---|
| Start with a clean mix | Proper headroom and export help ensure your master does not clip or distort unintentionally. |
| Use LUFS and true peak. | Metering loudness and peak levels is vital for streaming compatibility and professional results. |
| Apply subtle changes | Mastering is about minor EQ and compression adjustments rather than fixing mix errors. |
| Final stage verification | Always check mono compatibility and streaming platform specifications before exporting. |
| Conservative workflow pays off. | Smaller, well-measured mastering moves prevent artifacts and preserve musical integrity. |
What You Need to Master Audio in Your DAW
Having set the stage for why mastering matters, the next step is what you'll need to get started. Before you touch a single plugin, you need a clean foundation. A practical mastering workflow in a DAW begins with a correctly exported stereo mix that gives you room to work. That means your mix peaks should land somewhere between -6 and -3 dBFS (decibels relative to full scale). Any hotter than that and your limiter will fight your dynamics before you've even started shaping your sound.
Your audio editing essentials matter here, too. A mix with clipping, phasing issues, or a muddy low end will not suddenly fix itself in mastering. So review your mix critically before exporting.
Here are the core tools every mastering chain needs:
- Linear phase EQ or minimum phase EQ for tonal shaping
- A stereo bus compressor for glue and dynamic control
- A brick wall limiter with true peak detection
- An integrated loudness meter (LUFS-capable)
- A true peak meter that reads inter-sample peaks accurately
- A spectrum analyzer to visualize tonal balance across the full frequency range
- A correlation meter for stereo field and mono compatibility checks
When optimizing your DAW for mastering, session settings also matter. Run your project internally using 32-bit floating-point. Work at 44.1 kHz or 48 kHz unless your delivery format requires higher resolution. Keep your CPU load low by freezing tracks and eliminating unnecessary plugins on other channels.
| Chain module | Type | Primary function |
|---|---|---|
| EQ (first position) | Linear or minimum phase | Tonal correction and enhancement |
| Compressor | Stereo VCA or optical | Dynamic glue and control |
| Mid-side EQ | Optional | Stereo field tonal refinement |
| Stereo imager | Optional | Width and depth adjustment |
| Limiter | Brick wall, true peak | Peak control and loudness maximization |
| Loudness meter | Integrated LUFS + TP | Streaming normalization compliance |
Pro Tip: When you export your mix for mastering, bounce it without any limiting or heavy processing on the master bus. Give yourself that headroom, and you will have far more control over the final result.
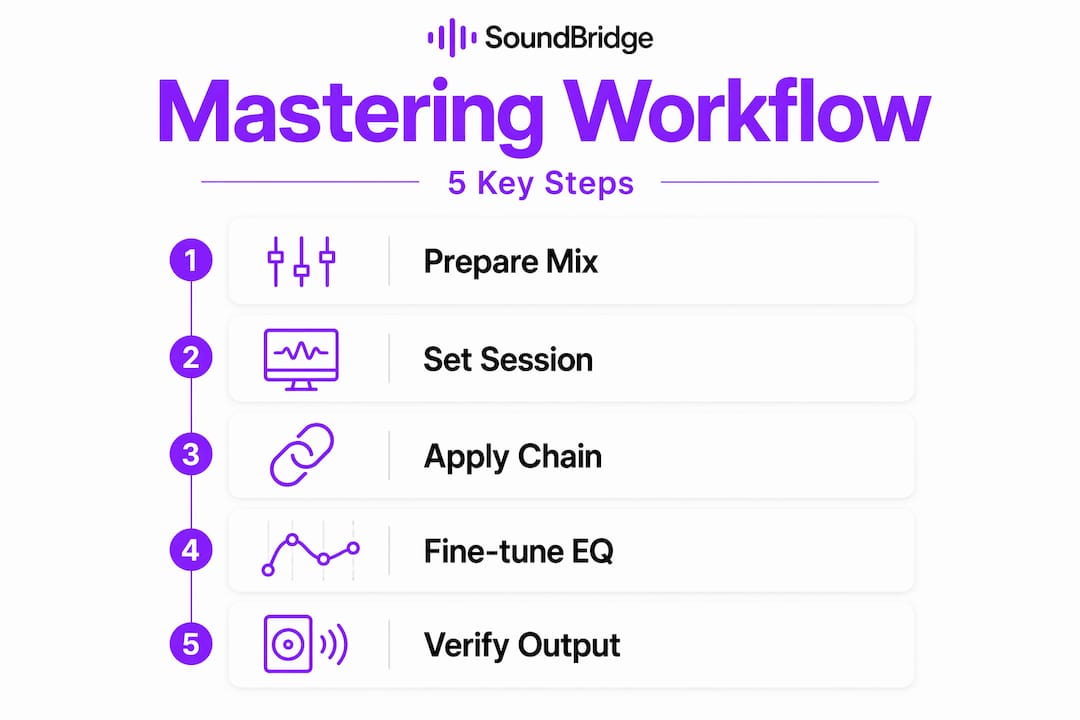
Step-By-Step Mastering Workflow
Now that you've gathered your tools, here's how to execute a reliable mastering workflow from start to finish. Think of this as your production blueprint, a repeatable system you can apply to every track you master.
-
Import your stereo mix into a fresh mastering session. Confirm that the file is 24-bit or 32-bit floating-point and that the peaks are in the -6 to -3 dBFS range. If they are too hot, go back and adjust your mix before proceeding.
-
Analyze levels and tonal balance. Before touching EQ or compression, run your track through a spectrum analyzer and a loudness meter. Note where the low end sits, check for harsh mids, and identify any frequency buildup. This is your map for the entire session.
-
Apply EQ for tonal correction. Use subtle moves, think 1 to 3 dB maximum for broad shelving or gentle bell curves. Boost or cut to balance the overall frequency picture, not to compensate for mix problems. Reference a music production workflow you trust to keep perspective.
-
Apply a stereo bus compressor. Set a ratio between 1.5:1 and 2:1, attack around 30 to 50 ms to let transients through, and release set to program-dependent or around 150 to 300 ms. Aim for 1 to 3 dB of gain reduction at most. The goal is glue, not squash.
-
Check loudness with an integrated LUFS meter. LUFS, true peak, and headroom are all critical for streaming normalization compatibility. Platforms measure perceived loudness, not just peak values, so your DAW's peak meter alone will mislead you.
-
Apply your limiter last. Set the ceiling to -1.0 dBTP (true peak). This prevents inter-sample clipping, a form of distortion that occurs when digital audio is converted to analog and then reconstructed between sample points. The limiter belongs at the end of your mastering chain, always.
-
Verify and export. Check your integrated LUFS reading against your target platform. Adjust limiter threshold or compressor gain accordingly. Bounce your final master at the appropriate bit depth and sample rate.
Streaming platforms have different loudness targets. Here is what you need to know:
| Platform | Integrated LUFS target | True peak ceiling |
|---|---|---|
| Spotify | -14 LUFS | -1.0 dBTP |
| Apple Music | -16 LUFS | -1.0 dBTP |
| YouTube | -14 LUFS | -1.0 dBTP |
| Tidal | -14 LUFS | -1.0 dBTP |
| SoundCloud | -14 LUFS | -1.0 dBTP |
A limiter ceiling of -1.0 dBTP is the standard across every major streaming platform. Going above this risk clips artifacts after lossy encoding, which is exactly what happens when your WAV file is converted to MP3 or AAC for playback.
Pro Tip: Use both an integrated loudness meter and a true peak meter simultaneously during your final limiter stage. Peak meters alone cannot tell you how loud your track actually sounds. Real loudness lives in LUFS.
To sharpen your bassline mastering, make sure your low end isn't eating up all your headroom before the limiter even engages. A well-balanced low end gives your limiter room to breathe. You can also use a mastering workflow guide to cross-reference your chain order and confirm you are following best practice. Understanding the mastering studio role gives you context for why each decision matters in a professional setting.
Fine-Tuning: Tonal Balance and Dynamic Control
With the workflow foundation in place, the next step is fine-tuning your track's tonal and dynamic character for professional polish. This is where mastering becomes a craft, not just a technical checklist.
EQ in mastering is about refinement. You are not rebuilding the mix. Mastering is a refinement stage, not an overhaul. If you find yourself reaching for 6- or 8-dB boosts, stop. That is a sign of a mix problem, not a mastering problem. Return to your session and fix the source.
Warning: Applying heavy EQ moves in mastering is a red flag. If a frequency is truly problematic, it needs to be corrected at the mix stage. Using mastering to fix mix issues results in unnatural tonal shifts that can hurt your track’s translation across playback systems.
Here is a practical set of EQ moves and compression settings to use as a starting reference:
Typical EQ moves:
- Low shelf boost at 30 to 60 Hz (+1 to +2 dB) to add weight and warmth
- High-pass filter at 20 to 30 Hz to remove subsonic rumble
- Broad bell cut around 200 to 400 Hz (-1 to -2 dB) to reduce muddiness
- Gentle high shelf boost at 10 to 16 kHz (+0.5 to +1.5 dB) for air and presence
- Targeted narrow cut at any harsh or brittle frequency
Typical compressor settings:
- Ratio: 1.5:1 to 2:1
- Attack: 30 to 80 ms
- Release: 150 to 300 ms or program-dependent
- Gain reduction: 1 to 3 dB maximum
- Knee: Soft, for transparent response
Tools like iZotope Ozone 12 offer modular workflows with dedicated processors for Stem EQ, Bass Control, the Unlimiter for recovering over-limited tracks, and an intelligent maximizer. These tools do not replace your ears, but they give you measurable, visualized feedback that makes subtle decisions easier to verify.
Your EQ mastering tips should always serve the music. If a frequency tweak makes the track less exciting or colors it in a way that feels unnatural, pull it back. Less is more here. The same rule applies when you work on mastering vocals: vocal presence is about balance, not excessive boosting.
Verification: Metering, Mono Compatibility, and Common Mistakes
After enhancing the tonal and dynamic character, verification ensures your master translates everywhere and avoids costly mistakes. This stage separates professional results from amateur ones.
Here are the final checks to run before you export:
-
Check integrated LUFS. Your reading should match the target for your primary delivery platform. Use a meter that calculates integrated loudness over the full duration of the track, not just a short-term reading.
-
Check true peak levels. Confirm your true peak ceiling does not exceed -1.0 dBTP. If it does, increase the limiting slightly or reduce the compressor's makeup gain.
-
Sum to mono and listen. Mono compatibility and true peak metering are non-negotiable final checks. When you sum to mono, listen for low-end collapse, mid-phase cancellation, or any elements that suddenly disappear. These point to stereo widening issues or phase problems in the mix.
- Check stereo correlation. Your correlation meter should read above 0 for most of the track. Readings near or below 0 indicate potential mono compatibility issues.
-
A/B test against a reference track. Match loudness using your LUFS meter, then compare your master to a commercially released track in a similar genre. Listen for tonal balance, punch, and clarity.
Common mastering mistakes to avoid:
- Over-limiting: Pushing your limiter too hard crushes transients and kills punch. Your snare and kick will lose impact, and your track will sound fatigued.
- Ignoring mono compatibility: Wide stereo mixes can sound fantastic in headphones, but fall apart on mono playback systems like phone speakers and club PA subs.
- Skipping true peak metering: DAW peak meters do not catch inter-sample peaks. Always use a dedicated true peak meter.
- Using EQ to fix mix problems: Heavy corrective EQ at the mastering stage creates phase artifacts and unnatural tonal shifts. Fix it in the mix.
- Chasing loudness over dynamics: A louder master is not always a better master. Dynamics give music emotion and energy. Protect them.
- Not checking reverb mastering checks: Reverb tails can cause sustained inter-sample peaks that only appear during loud passages. Analyze the whole track, not just the chorus.
Pro Tip: Always check your final loudness and peak readings in the context of your delivery platform. A master that sounds punchy at -9 LUFS will get turned down by streaming normalization. You are not winning anything by going louder. Find more insight through collaborative mastering tips and learn how professional teams approach verification together.
What Most Tutorials Miss About Mastering Workflows
With verification done, it is time to reflect on what separates engineers who get consistent results from those who chase their tails session after session. Here is what most tutorials will not tell you.
Most guides focus on the chain order and the plugins. Almost none of them emphasize the single most important skill in mastering: learning to trust your meters over your ears in specific moments. Your ears adapt. After 20 minutes of listening, your perception of loudness and tonality shifts significantly. But a LUFS meter does not adapt. It tells you the truth every time.
Many producers approach mastering by mimicking the loudness of tracks they admire, without realizing that the entire mix beneath them shaped those commercial masters. They were not made loud by a limiter preset. They were made louder by dynamic range management across every layer of the production. Trying to replicate that loudness purely at the mastering stage is a trap.
The value of restraint is real. A chain with fewer, more purposeful moves almost always beats an overloaded chain full of subtle processors stacked on each other. Every plugin adds phase interaction and potential coloration. The more you add, the harder it becomes to identify what is helping and what is hurting.
The best approach is to focus your mastering chain on observable outcomes. Ask yourself: what specific problem am I solving with this plugin? If the answer is vague, remove it. Explore fresh insights into music production regularly to sharpen your critical listening and workflow thinking.
Pro Tip: Focus your mastering chain on observable outcomes, not myth-driven presets. If you cannot hear what a processor is doing when you bypass it, it probably does not need to be there.
Take Your Mastering Further With SoundBridge
Mastering with confidence takes practice, great tools, and the right learning environment. SoundBridge gives you all three in one place.
Whether you are building your first mastering chain or refining an advanced workflow, SoundBridge DAW is designed to support every stage of your process. The platform's digital processing at up to 192kHz, combined with an intuitive interface, makes it easier to hear every detail your master needs. Explore the full audio editing techniques guide to sharpen your pre-mastering preparation, and dive into the frequency mastering guide to take your EQ decisions to the next level. Your next great master is closer than you think.
Frequently Asked Questions
How much headroom should I leave in my mix before mastering?
Aim for mix peaks between -6 and -3 dBFS to give yourself enough room to apply EQ, compression, and limiting without introducing clipping or artifacts.
What loudness target should I use for streaming platforms?
For most streaming services, target integrated loudness around -14 to -16 LUFS, with true peak below -1.0 dBTP; Spotify at -14 LUFS and Apple Music at -16 LUFS.
Where should I place the limiter in my mastering chain?
The limiter should always be the last processor before output, set to your target true peak ceiling of -1.0 dBTP.
How do I check mono compatibility in mastering?
Sum your master to mono in your DAW and listen for low-end collapse or phase cancellation. Mono and true peak checks are essential final steps before any export.
What's at stake in beginner mastering?
Over-processing with EQ or compression instead of returning to the mix stage. Heavy EQ in mastering signals a problem that should have been addressed during mixing, not masked at the mastering stage.
Recommended
MASTER MUSIC PRODUCTION
Expert-led courses designed to take you from fundamentals to finished tracks.

HOUSEFrom bouncy bass and solid kicks, this course teaches you the most modern House music production techniques needed to succeed and stand out.

TRAPQuit sounding like generic Trap and produce something World with hints of the Far East. Create ethnic soundscapes to put your Trap ahead of the curve.

AMBIENTProduce relaxing, sophisticated psy-influenced ambient. Psychedelic and relaxing to listen to, create meditative soundscapes to put your listeners in Zen.