

Fix Control Surface Setup in Three Moves for Producers
Last Edited: Oct 5, 2026
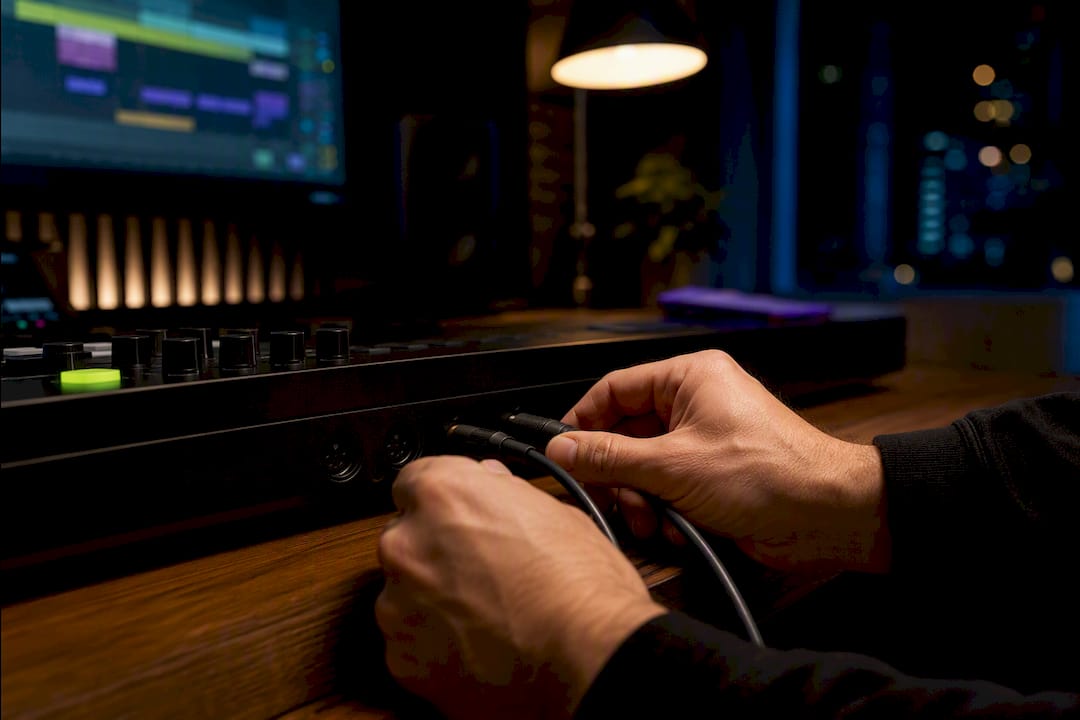
Get your control surface working in three moves: enable it inside your DAW’s device preferences, connect the correct MIDI or USB port, and set the hardware to the right protocol mode (MCU, HUI, or DAW-specific) before you scan. Most first-time failures stem from skipping that mode switch. Once your DAW sees the device on the right port and speaking the right language, faders move, LEDs light up, and you’re mixing with your hands instead of your mouse.
TL;DR:
- Most control surface connection failures stem from skipping the step of switching the device to the correct protocol mode, such as MCU or HUI, before scanning in the DAW.
- Proper wiring needs matching input and output ports, especially for MIDI DIN controllers, with direct connections preferred to avoid driver conflicts and MIDI jitter issues.
- Automatic detection supports many devices, but for unsupported models, manual setup involves selecting device profiles and assigning MIDI input/output ports.
- Firmware updates must be followed precisely with manufacturer instructions to prevent bricking or unresponsiveness, and both firmware and driver installations are essential for proper operation.
- Using powered USB hubs, monitoring MIDI activity, and documenting custom mappings help prevent recurring setup issues and improve workflow consistency.
Quick Control Surface Setup Checklist
Before you chase phantom hardware problems, run through this sequence. It solves the majority of “my controller won’t connect” tickets without opening a single settings menu you don’t need.
- Check your physical connection. Plug directly into a USB port on your computer when possible. If you’re using 5-pin MIDI DIN cables, route them through a powered MIDI interface rather than a bus-powered hub.
- Open your DAW’s device preferences and scan. Most DAWs offer an automatic scan; if it comes up empty, look for a “New” or “Install” option to add the device manually.
- Select the correct device profile. Choose your exact model if it’s listed, or fall back to a generic MCU/HUI mapping if it isn’t.
- Set Input and Output ports. Assign both, even if the interface only shows one obvious choice.
- Flip the hardware’s DAW mode switch, if your controller has one, to MCU, HUI, or a DAW-specific setting.
- Test a fader and watch for LED feedback. No response means it’s time for MIDI mapping as a manual fallback.
How DAWs Register and Install Control Surfaces
Every DAW buries this differently, but the destination is the same: a preferences panel labeled Control Surfaces, External Devices, or Link & MIDI. That’s your control surface mapping home base, and it’s worth bookmarking mentally because you’ll return to it every time you add gear or troubleshoot.
Two install paths exist. Automatic detection (often “Scan All”) works when your DAW ships with built-in support for your exact model. When it doesn’t, you’ll manually select “New,” then either “Install” or a generic protocol option. According to the Mackie Control Universal Quick-Start Guide, this manual step also requires you to assign the MIDI Input and Output ports yourself, since automatic detection skips that step entirely.
Running more than one unit? That’s where control-surface groups come in. Extender units (extra fader banks) are paired with a primary controller, and the order in which you register them matters. Documentation on Ableton’s control surface mapping reference shows how surfaces get represented internally in an object list. Registering them out of order can shift which physical fader controls which channel strip. Whatever you configure gets written to a DAW-specific preference file, which is why a botched setup sometimes survives a full app reinstall until you clear that file manually.
Wiring and Ports: MIDI DIN vs. USB-MIDI
Older or professional-grade controllers often use separate 5-pin MIDI In and Out jacks, meaning true two-way communication (the kind that drives motorized faders and LED rings) requires both cables to be connected to a MIDI interface, not just one. Modern controllers usually collapse both directions into a single USB-MIDI connection, which simplifies wiring but hides two logical ports (input and output) behind one physical cable.
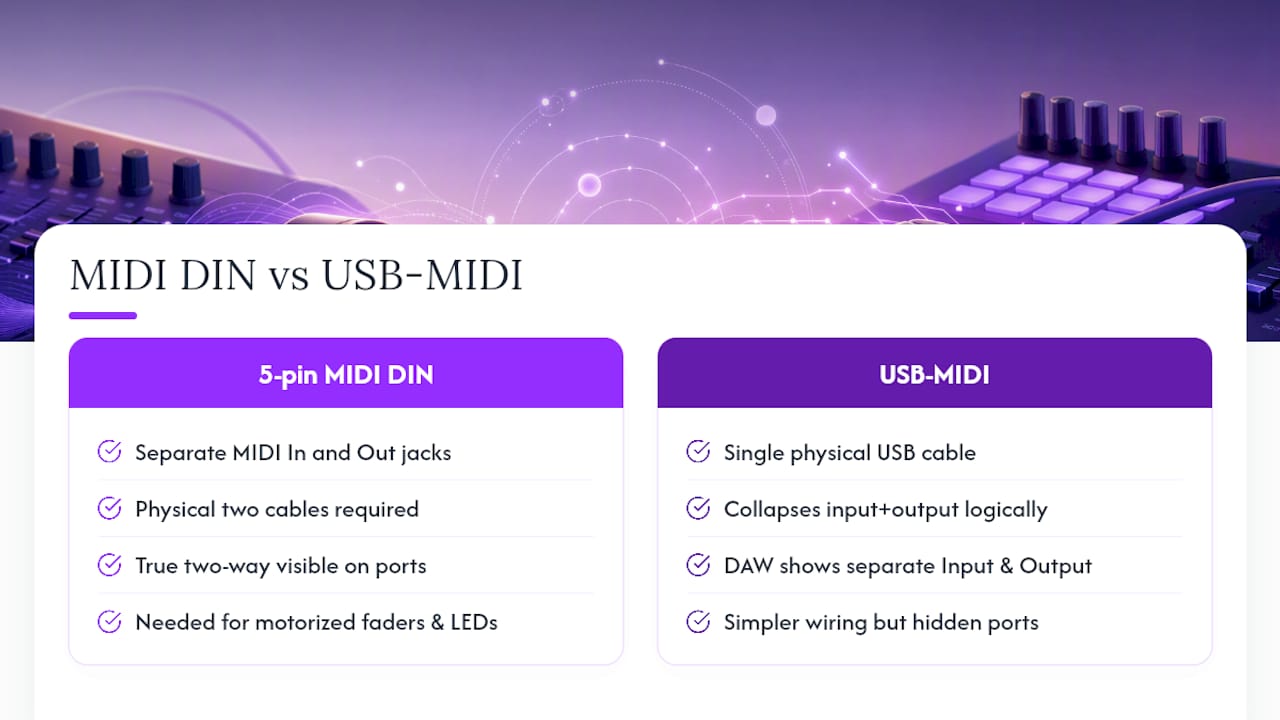
Inside your DAW, you’ll pick both an Input and Output port from a dropdown menu, and they need to match. Pick the wrong Output, and your controller will send data your DAW never sees.
Driver conflicts and cheap USB hubs account for a disproportionate share of the headaches here. Plug directly into your computer, or use a powered hub, and confirm any required driver or virtual MIDI cable is actually installed. When in doubt, open a MIDI monitor utility or watch your DAW’s built-in MIDI activity indicator. Seeing data flash on both Input and Output confirms the handshake is real, not just half-working.
What the Mackie Control Universal Protocol Actually Does
The Mackie Control Universal (MCU) protocol is the closest thing this industry has to a common language between hardware and software. It’s a bidirectional standard, roughly two decades old, still supported across most professional DAWs today, according to background on the Human User Interface Protocol. MCU (sometimes paired with its cousin HUI) lets your DAW automatically map faders, transport buttons, and rotary encoders, plus send LED feedback back to the hardware, all without you manually assigning a single MIDI Learn.
That automation depends entirely on mode selection, though:
- Controllers built around the Mackie Control Universal (MCU Pro) hardware reference typically need to be switched into MCU or HUI mode, often via a button combo at power-up.
- Skip that step, and the device reverts to acting like a generic MIDI controller. It’ll send raw note or CC data, but faders won’t move on their own, and LEDs stay dark.
- MCU support is broad enough to remain a safe default when your exact model isn’t natively supported by your DAW.
- No MCU option, or no working script? Your fallback is a vendor-supplied MIDI map or manual MIDI mapping, control by control.
Troubleshooting the Handshake When Detection Fails
When your controller doesn’t show up or shows up but won’t move, treat it as a script or protocol handshake problem first, not a hardware failure. Icon Pro Audio’s support checklist recommends this order of operations for industry troubleshooting
Power on the controller before launching your DAW, then run the scan. Starting the DAW first sometimes causes it to miss the device entirely during boot. If a scan still fails, manually confirm the device mode switch, reassign the MIDI In and Out ports, and temporarily disable any other connected MIDI gear to avoid conflicts on the same channel.
A MIDI monitor app becomes essential here. Watch specifically for SysEx messages, since many controllers use them for firmware handshakes and LED or fader state commands. No SysEx traffic at all usually explains why feedback is dead even though basic notes are getting through.
Pro Tip: If motorized faders twitch, stutter, or refuse to move to the right position, check pitch-bend channel assignments first. MCU implementations typically encode fader position as 14-bit pitch-bend data, and a channel mismatch is one of the most common causes of “broken” faders that are actually just misaddressed.
Firmware updates are sometimes unavoidable to fix stubborn feedback issues, and vendor manuals often walk you through the process by having you play a specific MIDI file from inside the DAW. Follow those steps exactly. Interrupting a firmware upload mid-transfer can leave a controller unresponsive.
MIDI Learn, Remote Scripts, and Building Your Own Controller
Not every workflow needs the full MCU treatment. MIDI Learn is fast: click a DAW parameter, twist a knob, done. It’s ideal for one-off mappings you won’t reuse. Remote scripts and DAW-specific control-surface APIs go deeper, offering persistent, two-way integration that survives project switches and doesn’t need to be rebuilt every session.
If you’re comfortable with scripting, Max for Live’s control-surface API offers granular control. Methods like register_midi_control, grab_control, and release_control, documented in Cycling '74’s ControlSurface reference, let you claim specific hardware elements (say, just the LED ring on one encoder) while leaving the rest of the controller on default behavior.
Want to build your own hardware from scratch? The Control Surface Arduino library provides DIY builders with a straightforward way to send standard CC messages over USB-MIDI from a custom potentiometer or button array.
A few habits worth adopting regardless of your path:
- Document every custom mapping the day you build it, not months later when you’ve forgotten the logic.
- Reserve one surface exclusively for transport and automation to avoid control conflicts.
- Never let two devices share the same MIDI channel unless you’re deliberately layering them.
Calibrating Faders and Knobs for Accurate Response
Out of the box, most control surfaces respond reasonably well, but “reasonable” isn’t the same as accurate, especially on older motorized faders or knobs with worn detents. If a fader consistently overshoots its target or a knob feels twitchy at the edges of its range, calibration is usually a hardware-side menu on the controller itself, not something you fix inside the DAW.
Most professional surfaces include a calibration mode, often triggered by a specific button combination at startup, that walks the motorized faders through their full range of motion so the internal encoder can relearn its endpoints. Skipping this after a firmware update is a common reason faders suddenly feel imprecise even though nothing else changed.
Sensitivity is a separate issue from calibration. Some DAWs let you adjust how much physical movement corresponds to how much on-screen change, useful if you’re doing detailed automation work and a fader feels too twitchy for fine moves. Look for a sensitivity or “fader curve” setting inside the DAW’s control surface preferences rather than assuming it’s fixed in hardware.
Rotary encoders (the endless knobs used for panning or plugin parameters) sometimes need their acceleration curve adjusted too. If a single turn jumps a value too far, that’s almost always a software-side sensitivity setting rather than anything wrong with the encoder itself. Test with something visual, like a pan control, so you can see the relationship between physical movement and on-screen response before committing to a curve.
Assigning Controls to Specific DAW Functions and Plugins
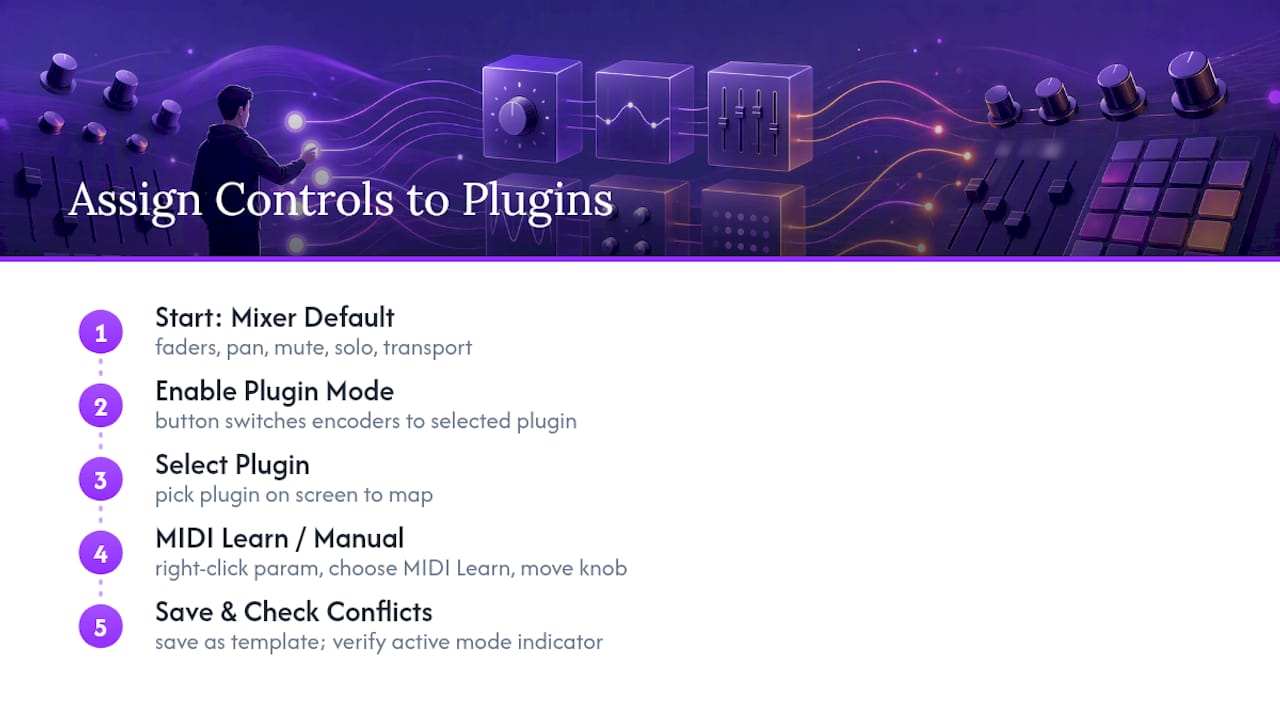
A control surface is only as useful as its mapping. Out of the box, MCU-compatible surfaces default to controlling the mixer: volume faders, pan, mute, solo, and transport. That’s a solid starting point, but the real value shows up once you start assigning knobs and buttons directly to plugin parameters.
Most DAWs offer a “Plugin Control” or “Instrument Control” mode on the surface, sometimes triggered by a dedicated button, that temporarily reassigns the encoder bank to the plugin currently selected on screen rather than to the mixer channel. This is where a control surface actually saves time. Sweeping a filter cutoff on a physical knob instead of dragging a tiny on-screen slider is the entire reason tactile control exists.
For elements that don’t map automatically, you’re back to MIDI Learn or manual assignment inside the plugin or DAW’s mapping browser. Right-click the parameter, choose “MIDI Learn,” and move the physical control. Save that mapping as part of your project or as a global template if you use the same plugin often.
Pro Tip: Build a small set of “go-to” plugin mappings for your three or four most-used plugins, EQ, compressor, reverb, and save them as templates. Recreating the same eight knob assignments every session wastes more time than any other part of control surface work.
Watch for conflicts between global transport mappings and plugin-specific assignments. If a knob controls both a plugin parameter and a mixer function depending on mode, confirm your DAW clearly indicates which mode is active. A control surface with ambiguous mode indication is worse than no control surface at all.
Using One Control Surface Across Multiple DAWs
Producers who bounce between two DAWs, or freelancers who work on client projects built in software other than their own, run into a real limitation here: control surface mappings and remote scripts are almost always DAW-specific rather than universal. A mapping built for one DAW’s MCU implementation won’t automatically transfer to another, even if both support MCU in theory.
The practical fix is keeping your hardware in a neutral protocol mode (MCU or HUI, whichever is more broadly supported) and letting each DAW’s own preferences handle the rest. Since mapping preferences are saved per DAW rather than per controller, switching applications means your control surface is effectively reconfigured each time, sometimes automatically, sometimes requiring a manual re-scan.
If you’re moving projects between machines or collaborating remotely, consistency becomes the harder problem. Two collaborators with the same physical controller but different custom mappings will experience wildly different behavior on identical hardware. That’s less a technical bug and more a documentation gap: without a shared reference for what each knob does, drift is inevitable.
The cleanest solution is to treat your primary controller’s mapping as canonical and document it once, then reference that document whenever you set up on a new machine or DAW, rather than rebuilding it from memory. It’s a small administrative habit, but it’s the difference between a five-minute setup and a frustrating half-hour of retracing steps you’ve already solved once.
Firmware Updates and Driver Installation
Firmware and drivers are two separate layers, and conflating them is a common source of confusion. The driver is what your operating system uses to recognize the controller as a MIDI device at all. Firmware is the software running inside the controller itself, governing things like LED behavior, button response, and how fader positions get encoded.
Driver installation is usually a one-time step: download the manufacturer’s package, install it, restart your computer, and confirm that the device appears in your system’s MIDI device list before you even open your DAW. Skipping this and going straight to DAW-level setup is a common reason a scan comes up completely empty.
Firmware updates are less frequent but higher stakes. Vendor manuals, including the Mackie Control Universal Quick-Start Guide, often specify a firmware update process that involves playing a special MIDI file directly from your DAW’s transport rather than using a standalone updater application. That’s an easy step to get wrong if you’re not expecting it.
Follow the vendor’s sequence exactly, including any required order of powering on the device versus opening the DAW. Interrupting an update partway through by closing the DAW or disconnecting the cable can leave the controller in a state that requires a full reset or, in rare cases, professional recovery. After a successful update, you’ll typically need to re-run your DAW’s device scan, as the firmware update can reset how the controller identifies itself.
Keeping Latency and MIDI Jitter Under Control
A control surface that feels sluggish or introduces audible timing drift usually isn’t a hardware problem: it’s a configuration one. MIDI jitter (small, inconsistent timing variations in when messages arrive) becomes noticeable mostly during automation recording, where a fader move that should land precisely on a beat instead lands a few milliseconds off.
USB hubs are the most common culprit. Routing your control surface through a cheap, unpowered hub alongside other USB devices competing for bandwidth introduces exactly the kind of inconsistent timing that shows up as jitter. Direct connection to a computer’s USB port, or a dedicated powered hub used only for MIDI and audio gear, solves most of this immediately.
Buffer size settings inside your DAW’s audio preferences also affect how responsive your control surface feels, even though buffer size is technically an audio interface setting rather than a MIDI one. Lower buffer sizes reduce the perceived lag between moving a physical fader and seeing the on-screen response, at the cost of higher CPU demand.
If you’re running your control surface alongside a busy MIDI setup (multiple keyboards, a separate drum pad controller, and a fader bank all connected at once), consider whether all of that traffic needs to share the same USB bus. Splitting devices across separate physical ports, rather than daisy-chaining through hubs, keeps each device’s data stream cleaner and reduces the likelihood that one device’s traffic will delay another’s.
Common Control Surface Error Codes and What They Mean
Error messages vary by manufacturer, but most fall into a handful of recognizable categories once you understand what’s actually failing.
A “device not found” or “no device detected” error almost always points to either a missing driver or an improperly selected USB/MIDI port in your DAW’s preferences, not a defective controller. Recheck your physical connection and driver installation before assuming hardware failure.
A “communication timeout” or “handshake failed” message typically means the DAW found the device but couldn’t complete the two-way protocol negotiation, often because the hardware wasn’t switched into the correct MCU or HUI mode before the scan ran. Power-cycle the controller in the correct mode and rescan.
“Firmware mismatch” or “unsupported firmware version” errors show up when a DAW update outpaces your controller’s firmware, or vice versa. The fix is almost always a firmware update following the vendor’s exact documented sequence, since guessing at the process risks an incomplete update.
A generic “MIDI port in use” error means another application, sometimes even a second instance of your DAW or a background utility, has claimed exclusive access to the port your controller needs. Close conflicting applications and restart the DAW before retrying the scan.
Studio Habits That Prevent Repeated Setup Failures
Small habits save you from having to relearn the same lessons every few months. Label your MIDI ports physically or in software, and keep a short setup notes file for each controller you own. Run controllers through a dedicated, powered USB hub, and put firmware checks on a recurring calendar reminder rather than waiting for something to break. If you collaborate remotely, agree on one canonical mapping across everyone’s setup so drift doesn’t quietly creep in between sessions.
— Wake
Control Hardware Your Way Inside SoundBridge
SoundBridge supports hardware controller workflows on both Mac and Windows, so the setup work you just did doesn’t get wasted the moment you switch projects or collaborate remotely. Bi-directional control means your faders, transport buttons, and encoders talk back to the software in real time, whether you’re mixing solo or running a zero-latency remote session with a co-producer three time zones away.

If you’ve been mapping controllers by hand inside a DAW that treats hardware integration as an afterthought, it’s worth trying an environment built with tactile control and remote collaboration in mind from the start. Start with the Free Version to test your controller setup risk-free, or explore what a digital audio workstation built for hands-on control can do for your next session. Enhanced remote collaboration features, including STUN/TURN server access, are available to producers who need studio-accurate sync with collaborators for a monthly fee.
Manuals and Docs Worth Bookmarking
For device-specific button and LED tables, consult the Mackie Control Universal Quick-Start Guide directly. Developers building custom integrations should keep Cycling '74’s Max for Live API reference close at hand for scripting calls and control registration examples.
Sources
- Mackie Control Universal Quick-Start Guide (manual)
- Human User Interface Protocol — Wikipedia
- ALL DAW CONTROLLERS: Control Surface Troubleshooting Checklist — Icon Pro Audio Support
- ControlSurface LOM — Cycling '74 Max for Live docs
FAQ
What Is the Best Control Surface for Pro Tools?
Pro Tools works natively with EUCON-based surfaces, but it also supports HUI and MCU-compatible controllers for standard mixing and transport control. The right choice depends on your budget and whether you need deep plugin integration or just solid fader and transport control for everyday mixing.
What Does Shift + R Do in Logic?
In Logic Pro, "C" is commonly used to trigger cycle recording or related recording-mode toggles, though exact behavior can shift slightly between Logic versions. Check Logic’s own key command preferences if the shortcut doesn’t behave as expected, since custom key mappings can override defaults.
What Is a Control Surface in Logic Pro?
A control surface in Logic Pro is any external hardware controller, fader bank, keyboard with transport buttons, or dedicated mixing surface that Logic recognizes through its Control Surfaces preferences and maps to on-screen functions like volume, pan, and transport. Logic supports both native MCU-compatible devices and manual MIDI mapping for unsupported hardware.
What Is an Audio Control Surface?
An audio control surface is a physical hardware device with faders, knobs, and buttons that lets you control your DAW’s software functions, mixing, transport, and plugin parameters with your hands instead of a mouse. Most modern surfaces communicate via the MCU protocol, sending and receiving MIDI data to keep on-screen and physical controls in sync. Platforms like SoundBridge build in bi-directional control support so these surfaces work as intended right out of the box.
Recommended
MASTER MUSIC PRODUCTION
Expert-led courses designed to take you from fundamentals to finished tracks.

HOUSEFrom bouncy bass and solid kicks, this course teaches you the most modern House music production techniques needed to succeed and stand out.

TRAPQuit sounding like generic Trap and produce something World with hints of the Far East. Create ethnic soundscapes to put your Trap ahead of the curve.

AMBIENTProduce relaxing, sophisticated psy-influenced ambient. Psychedelic and relaxing to listen to, create meditative soundscapes to put your listeners in Zen.