RitMix Manual
Last Edited: Jul 14, 2025
SUMMARY
RitMix is a versatile sample-based drum machine that can be used for live performances and studio production. It is fully vector-based and can be resized by dragging on its lower right corner.
TOP COMMAND BAR
The top menu bar contains the navigation that leads through RitMix’s different views, the main settings, and a few controls.
Kit Management

1. The Menu Button - Offers kit management options.
-
Save Kit - Saves the current kit.
-
Save Kit As… - Saves the kit to a specific location on your hard drive.
-
Load Kit - Loads a kit from a specific location on your hard drive.
-
Initialize Kit - Initializes RitMix.
2. The Kits Button - Displays the Favorite Kits List. The Favorite Kits List is a list of quickly accessible kits with their controls

-
Load - Loads the selected kit.
-
Replace - Replaces the selected kit with the one currently populating RitMix. Only custom user kits are replaceable.
-
Remove - Removes the selected kit from the favorite kits list.
3. Add Kit button - Adds the kit currently populating RitMix to the Favorite Kits list.
View Buttons

-
Pads - Displays the Pad View.
-
Edit - Displays the Edit View.
-
Sequencer - Displays the Sequencer View.
-
Mixer - Displays the Mixer View.
-
FX - Displays the Effects View.
-
Kill Sound - Stops all currently playing sounds.

-
Nudge + - Temporarily speeds up RitMix’s BPM for manual syncing with external sources.
-
Nudge - - Temporarily slows down RitMix’s BPM for manual syncing with external sources.
-
Tempo Selector - This sets the BPM for RitMix. Drag or double-click to modify.
-
Sync Host - Synchronizes RitMix with the host DAW’s BPM.
-
TAP - The Tap button allows you to manually tap the BPM you wish to set the RitMix tempo selector to.
-
BPM LED - This is a visual representation of the BPM in RitMix. Lights up on every beat when “Sync Host” is not engaged.
- Sequencer Mode - This mode ignores pads set to loop mode and note-off events that trigger the Release of the envelopes. This button ensures that when you Drag Out the MIDI from RitMix's 16-step sequence, the external MIDI playback is identical to what you created in RitMix.
-
Play - Starts the Sequencer’s playback.
-
Record - Allows recording of patterns into the sequencer by playing the pads. When Sync Host is deactivated, striking any pad starts the recording.
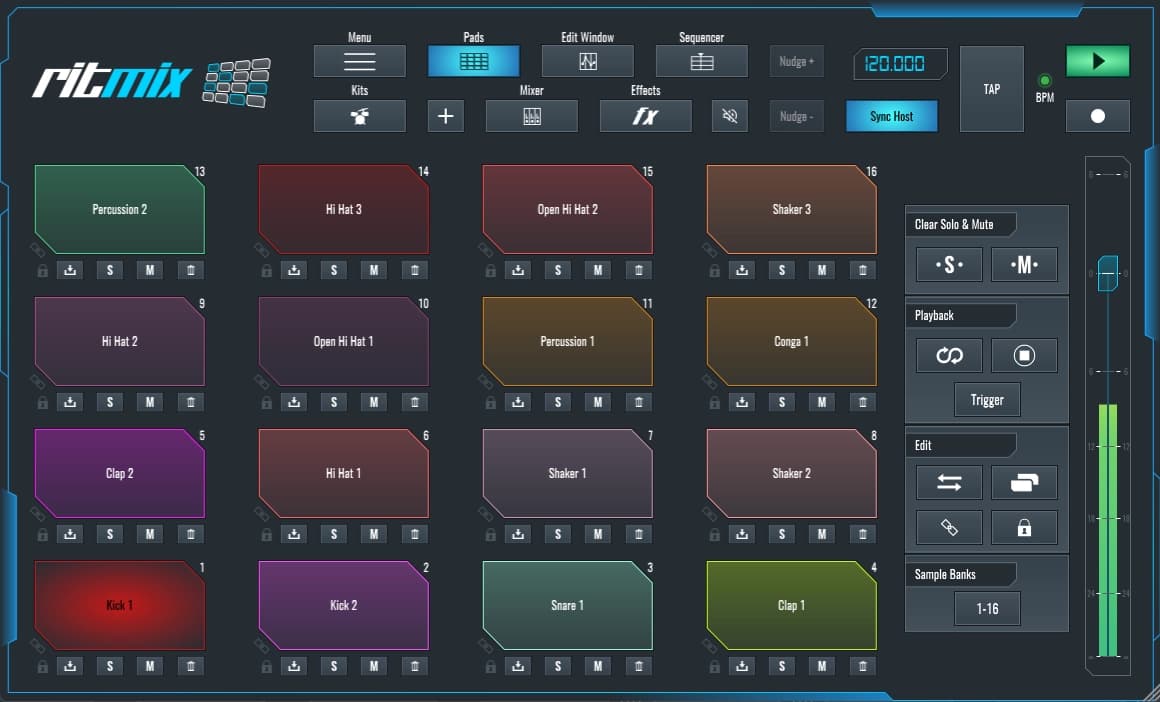
PAD VIEW
Each of the pads is an independent sampling unit with a set of accompanying controls and indicators.

-
Link Indicator - Indicates linked pads. Triggering any pad in a linked group triggers all of them simultaneously.
-
Lock Indicator - Indicates a locked pad. Locked pads do not change when a new kit is loaded. They can’t be muted, soloed, deleted, or replaced by loading another sample.
-
Load Sample - Loads a sample onto a pad.
-
Solo - Soloes a pad or group of pads such that nothing else is audible.
-
Mute - Mutes a pad or group of pads such that they are not audible.
-
Delete - Removes the sample loaded on a pad.
Pad View Controls
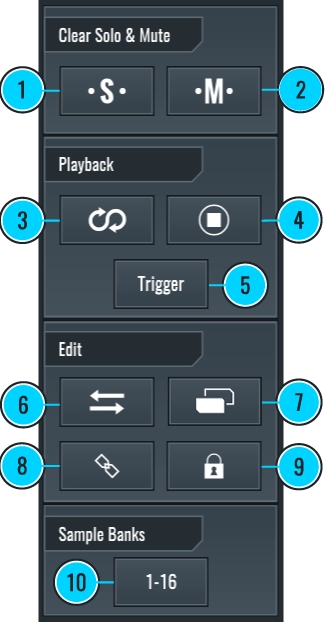
-
Clear Solo - Deactivates all the solo buttons activated on any of the pads.
-
Clear Mute - Deactivates all the mute buttons activated on any of the pads.
-
Reverse - Reverses the sample loaded on the selected pad.
-
Hard Stop - Makes the pad monophonic, allowing only a single instance of the sample contained in the selected pad to be playable at a time.
-
Playmode - Toggles between single playback and looped playback. In looped playback, a triggered sample will play and loop as long as the pad stays pressed.
-
Swap Pad - Swaps the currently selected pad with the next one pressed.
-
Duplicate Pad - Duplicates the currently selected pad to the next empty one pressed.
-
Link - This button will link the currently selected pad with any pad pressed while the link button is active. Activate the button and select the pads to be linked, then deactivate the link button to finish the linking process.
-
Lock -This button will lock the currently selected pad, and any pad pressed while the lock button is active. Activate the Lock button and select pads to be locked, then deactivate to finish the locking process.
-
Toggle Sample Banks - Toggles between four sample banks with 16 available sample pads each.
EDIT VIEW
Edit view is where audio samples contained in any pad can be controlled.
Sample Display Window

-
This window displays the loaded sample’s waveform, loop, start and end markers, and envelopes. You can zoom in and out of the waveform using CTRL + Scroll Wheel/Track Pad or CTRL + (+ / –).
-
Loop markers can be adjusted by clicking and dragging.

The Trigger Button - Triggers the playback of the currently selected pad.
Mixer Controls
You can find basic controls over audio playback in this section. These are all pad-specific.

-
Gain Fader - Controls the playback volume.
-
Pan - Controls the panning or stereo balance.
-
Spread - Controls the stereo width of the sample by modifying the balance between the Mid and Side components of the signal.
-
Solo - Soloes the currently selected pad.
-
Mute - Mutes the currently selected pad.
-
Invert - Inverts the polarity of the selected audio sample.
Samples/ MIDI / Playback Sections
Samples section is where a pad to be edited in the Edit View is selected.

-
Pad - This opens a window for selection and basic control of the current bank’s 16 samples.
-
Sample Bank Selection - This allows the user to select one of four sample pad banks, each containing 16 pads.
-
Normalize - This normalizes the audio sample to 0.0 dBFS.
-
MIDI Learn - When activated, RitMix will take an incoming MIDI note from a controller and assign it to the currently selected pad.
-
Assigned Note Display - This displays the MIDI note that has been assigned to the selected pad.
- Velocity > Volume - Determines how much the velocity of MIDI notes affects the playback volume of the sample.
-
Reverse - This reverses the sample loaded on the selected pad.
-
Hard Stop - Makes the pad monophonic, effectively allowing only a single instance of the sample contained in the selected pad to be playable at a time.
-
Playmode - Toggles between single playback and looped playback. In looped playback, a triggered sample will play and loop as long as the pad stays pressed.
Envelopes/Humanizer
This section shows controls for setting and modifying RitMix’s humanizer and three other envelopes.

-
Toggles display between the envelope’s and the humanizer’s controls.
-
Enables or disables a specific envelope or the humanizer.
All envelopes have some common parameters.

-
Attack - Determines how much time is needed for the envelope to reach its maximum value from when it was triggered.
-
Decay - Determines the time it will take for the level of the envelope to reach the sustain level after the attack time has ended.
-
Sustain - Sets the value the envelope will retain after the attack and decay times have ended if the MIDI note is being held or the pad remains pressed.
-
Release - Determines the time it will take the envelope to reach its minimum value from the sustain level after the MIDI note or pad has been released.
-
Convexity Control Switches - When any of these is activated, it changes the corresponding knob into a convexity control that determines how the curve of a certain envelope parameter will progress in time linearly, logarithmically, or exponentially.
-
Sync - When enabled, the selected envelope will be synced to the BPM so values can be set based on musical divisions.
These parameters can be controlled by clicking and dragging the envelope points in the waveform display window.
By default, when the Amp envelope is disabled, the selected pad has a one-shot functionality (i.e., triggering it plays the entire duration of the sample loaded onto that pad, regardless of the length of the midi note that triggered it or how long it was pressed).
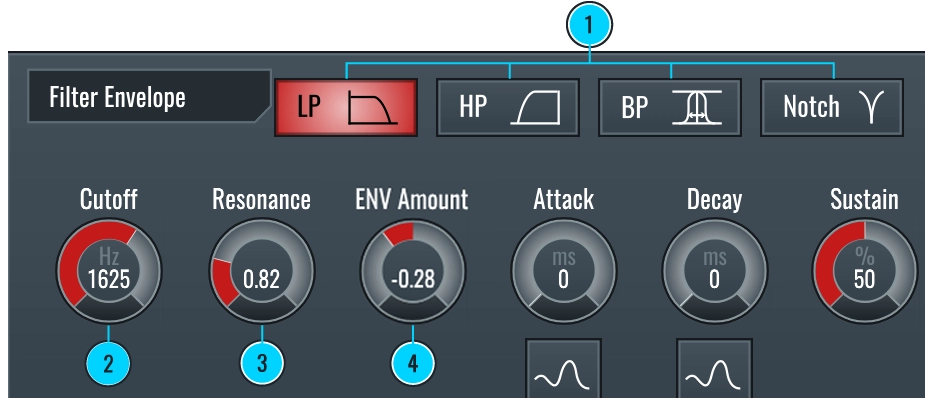
-
Filter Selection Buttons - These buttons determine which filter is used for the filter envelope, lowpass, highpass, bandpass, or notch.
-
Filter Cutoff - Determines the cutoff frequency of the filter.
-
Filter Resonance - Determines the additional resonance applied to the filter at the cutoff frequency.
-
ENV Amount - Determines how much the envelope affects the filter’s cutoff frequency.

-
Semi-Tones - Controls the sample’s pitch in semitones.
-
Cents - Controls the sample’s pitch in cents for finer pitch adjustment.
-
Envelope Amount - Controls the amount to which the envelope is applied to the pitch. The control acts bidirectionally, meaning that the envelope can raise or lower the pitch.
The Humanizer introduces randomness on specific parameters.

-
These knobs set the percentage of randomness introduced to the corresponding parameter.
EQ
The EQ (equalizer) can modify the frequency balance of the loaded sample. It has four parametric filters, each with frequency, gain, and Q controls.

-
Enable EQ Point - Activates/Deactivates the currently selected EQ point.
-
Frequency - Determines the center or cutoff frequency of the selected EQ point.
-
Gain - Determines how much boost or attenuation is applied to the selected EQ point.
-
Q - Determines how narrow or broad the filter’s effect will be on the selected frequency. Higher Q values will allow for more surgical action directly on the center frequency set. Lower Q values will result in the filter altering a broader range around the center frequency.
-
Analyzer - Shows/Hides the frequency analyzer.
-
EQ View - Shows/Hides a visual representation of the equalizer.

The picture shows the Equalizer and Analyzer in the audio waveform window.
Distortion
The Distortion box holds three distortion-like effects for the selected pad. It can be activated by using the on/off switch or by touching any of its parameters.

-
Bits - Reduces the amplitude resolution of the sample.
-
Downsample - Reduces the sampling frequency of the sample.
-
Drive - Applies an overdrive effect to the sample.
Sends
The Sends section controls the Send amount to either of two exclusive effects delay and reverb. Parameter controls for these effects can be found in the FX section.

-
Enable Button - This activates/deactivates the sends.
-
Reverb - Sets the gain of the signal sent to the reverb effect.
-
Delay - Sets the gain of the signal sent to the delay effect.
Routing

The Output Button - Shows RitMix’s multiple audio outputs. This allows for sending pad sounds and effects out of RitMix through separate audio outputs. It’s particularly useful for mixing samples/drumkits outside of RitMix.
MIXER VIEW
The Mixer view includes essential mixing controls for the current bank’s 16 samples. Additionally, this view accommodates a mini sequencer widget at the bottom.
Controls

-
Pad - Selects a pad and displays its sequencer pattern.
-
Pan - Controls the panning or stereo balance.
-
Solo - Soloes the pad.
-
Mute - Mutes the pad.
-
Delay - Determines how much of the pad’s audio signal is sent to the delay return effect.
-
Reverb - Determines how much of the pad’s audio signal is sent to the reverb return effect.
-
Gain - Controls the volume of the pad.
All of these controls are the same as those in the Edit Window of each pad.
Sequencer Controls

-
Toggle Sample Banks - Toggles between any of the four available sample banks.
-
Sequencer Controls - These control which sequencer pattern is displayed and how patterns connect.
For more information on the sequencer, go to the sequencer part of the manual.
FX VIEW
The FX view includes controls for the return effects, their audio routing, and controls for the master bus compressor.
Reverb

-
Reverb Time - Determines the decay time of the reverb.
-
Predelay - Determines how much time will pass between the original sound and the first early reflections of the reverb.
-
Early/Late Balance - Determines the balance between the early and late reflections of the reverb. At the default position, the balance is 50%-50%.
-
Bass Boost - Boosts low frequencies in the reverberation of the signal.
-
High Cut - Determines the cutoff frequency beyond which the reverberation signal is attenuated.
-
High Cut Amount - Determines the amount of attenuation applied beyond the frequency set by the “High Cut” parameter.
-
Gain Fader - Controls the volume of the reverb’s signal.
-
On Switch - Enables/Disables the reverb.
Delay

-
Sync Button - When activated, allows for setting delay times based on musical time divisions.
-
Delay Time - Determines the delay time after which the original sound is repeated.
-
Feedback - Determines how many times the delay effect will repeat the sound by affecting how strong the signal fed into the delay loop is over time.
-
LPF F.B. - Determines the amount of low pass filtering to be applied to the delay signal.
-
Stereo Fade - Determines the separation between the left and right channels fed back into the delay feedback loop.
-
Gain Fader - Controls the volume of the delay’s signal.
-
On/Off Switch - Enables/Disables the delay.
Compressor

The mastering compressor is applied to all signals going through Stereo Output 1/2. It’s intended to be used as a dynamic control of RitMix’s output.
-
Threshold - Determines the lowest input signal level that will be compressed.
-
Ratio - Determines how many times quieter the compressed level is compared to the input level. If the ratio is 2.00, the part of the input signal exceeding the threshold will be half its level after compression.
-
Attack - Determines how quickly the signal gets compressed after it has exceeded the threshold.
-
Release - Determines how quickly the signal returns to its uncompressed state after coming back below the threshold level.
-
Post Gain - Determines the post-effect gain applied in dB. This allows for volume compensation after compression.
-
On/Off Switch - Enables/Disables the compressor.
Output buttons

- Reverb Output - Allows selection of an independent output channel for the reverb signal.
- Delay Output - Allows selection of an independent output channel for the delay signal.
SEQUENCER VIEW
The Sequencer in RitMix is used as a standalone drum machine sequencer. It can sync to the host DAW, but can also act independently.
Each pad has four 16-step sequencers that can be linked in series, resulting in a 64-step sequencer. You can program a different length sequence and pattern for each pad.
Top Sequencer Controls

-
Toggle Sample Banks - Toggles between the four sample banks, of 16 samples each.
-
SEQ - Displays the selected sequencer pattern.
-
Arrow Buttons - These allow connection between the sequencer patterns. Once one of them is activated, the sequencer patterns on both sides will be linked. This means that they become one pattern with a cumulative amount of steps.
-
SEQ Length - Allows the user to shorten any of the sequencer patterns from 16 steps to any lower number, by clicking on the desired last step.
-
Trash - Clears the currently selected sequencer pattern. CTRL + Trash button clears the entire sequencer.
-
Drag MIDI Out - Allows for a MIDI pattern based on RitMix’s sequencer to be dragged onto a MIDI channel in the host DAW.
Pad Selection Buttons

Once a pad is selected, its sequencer patterns are displayed.
16 Step Sequencer

-
Sequencer - These 16 buttons are the step sequencer itself. Once the play button is pressed, the sequencer starts running and triggers the pad’s sample at every marked step. You can mark steps by clicking the sequencer’s buttons.
-
Parameter Values - This row of input fields is used for parameter sequencing.
Sequencer Parameters

-
Randomize Rhythm - Randomizes the selected sequencer’s pattern.
-
Pitch - Engages the sequencer into a parameter sequencing mode where pitch values can be set for each of the sequencer’s steps. Sequencer buttons become faders with text input fields underneath for manual input. Pitch sequencing values are bidirectional, and their neutral position corresponds to the one set in the Edit Window’s Pitch Envelope.
-
Filter - Engages the sequencer into a parameter sequencing mode where filter cutoff values can be set for each of the sequencer’s steps. Sequencer buttons become faders with text input fields underneath for manual value input. Filter sequencing values are bidirectional, and their neutral position corresponds to the one set for Cutoff in the Edit Window’s Filter Envelope.
-
Bits, Decimator, and Drive - These behave the same as the Pitch and Filter buttons. For each one of the distortion effects, a sequence of the parameter’s values can be created. These values are bidirectional, and their neutral position corresponds to the one set as the parameter’s value in the Edit Window.
-
Solo and Mute - Serve the same purpose as the solo and mute buttons in the Pad View, Edit View, and Mixer View.
-
Velocity - Allows for sequencing of the velocity parameter. Velocity parameter sequenced with this feature also translates into the MIDI file once it’s dragged out of RitMix into the host DAW. It’s unidirectional, and its default value is 100.
-
Pan - Engages the sequencer into a pan sequencing mode where pan values can be set for each of the sequencer’s steps. Behavior is identical to that of the Pitch and Filter buttons.
-
X2 - Effectively sets the sequencer to double speed.
-
/ 2 - Effectively sets the sequencer at half speed.
-
Gate - Engages the sequencer into a gate sequencing mode, where the gate or sample length values can be set for each of the sequencer’s steps. Its values span from 0-100 and are expressed in percentages. The higher the gate value for any of the steps, the shorter the sample will play at that step. The initial length of a sample is determined by the left and right loop markers in the sample’s Edit View.
-
Rolling Dice - These dice, found next to buttons that allow sequencing mode, allow for the randomization of sequencer values for their corresponding parameters.
Thanks to the following companies and their proprietary technology we use:
Apple Inc. technology: AU SDK
Steinberg Media Technologies GmbH technology: VST SDK.
PACE Anti-Piracy technology: JUCE library.
zplane.development technology: élastique Pro V3 (time stretching engine), fx::pack V1 (audio effects bundle engine), and z.reverb V2 (parametric reverberation engine).
VST is a trademark of Steinberg Media Technologies GmbH, registered in Europe and other countries.
MASTER MUSIC PRODUCTION
Expert-led Kurse, die dich von den Basics bis zu fertigen Tracks bringen.

HOUSEVon bouncy Bass und solid Kicks: Dieser Kurs zeigt dir die modernsten House-Production-Techniken, um zu gewinnen und herauszustechen.

TRAPKling nicht nach 08/15-Trap, sondern produziere etwas World mit Far-East-Vibes. Erstelle ethnische Soundscapes, damit dein Trap der Konkurrenz voraus ist.

AMBIENTProduziere entspannte, sofisticierte psy-influenced Ambient. Psychedelisch und relaxed zum Hören – erschaffe meditative Soundscapes für Zen.