

One Rule to Dither on Export: Engineers' 5 Step Checklist
Last Edited: Oct 5, 2026
Dither only when you’re reducing bit depth on the final export, and do it exactly once, as the very last step after limiting and gain changes. If you’re exporting 32-bit float or keeping the same bit depth, skip it entirely.
TL;DR:
- Dither should only be applied when reducing bit depth, such as converting from 24-bit or 32-bit float to 16-bit, and only once at the final export stage.
- Placing dither at any point after it has already been applied, or during intermediate bounces and stem exports, results in unnecessary noise layers and should be avoided.
- TPDF dither is the default, reliable choice for most cases, while noise-shaped dither benefits wide-dynamic, acoustic material but can cause issues with lossy compression.
- Dithering is unnecessary when working in 32-bit float format or when bit depth stays the same; it is also skipped during intermediate mixes or stems.
- To ensure proper dither placement, verify that your export dialog and any limiters do not have dither enabled simultaneously, and perform A/B testing to detect quantization artifacts.
When To Dither On Export: The Simple Rules
Here’s the check that matters: are you reducing bit depth? If yes, dither. If no, don’t touch it. That’s the entire decision tree, and Craig Anderton’s breakdown of dithering supports it as the first law of the process.
You’ll run into this constantly in real sessions. A few common triggers:
- Bouncing a 24-bit or 32-bit float session down to 16-bit for a CD master
- Delivering 16-bit masters to a label, distributor, or streaming aggregator
- Exporting stems for a legacy client whose system only accepts 16-bit files
- Converting a high-resolution mix to a lower fixed-point format for an older sampler or hardware unit
The reason dither exists at all comes down to what happens in the quiet parts of your track. When you truncate bits without dither, low-level signal, quiet fades, and reverb tails get quantized into a stair-step pattern instead of smooth noise. Your ear picks that up as a gritty, uneven texture right when the music should be disappearing into silence. Dither replaces that harsh artifact with a controlled hiss so low it stays inaudible on a full mix. Run the same fade with and without dither at low volume, and the difference is obvious once you know what to listen for.
How To Place Dither In Your Export Chain
Dither has to be the last thing that touches your audio. Any process after it — EQ, a limiter, even a gain nudge — reshapes the bit pattern dither just built and throws away the noise floor you added to mask quantization error. iZotope’s mastering guidance is direct about this: dither once, as the final step, full stop.
Here’s the sequence to follow every time:
- Finish all mixing and mastering moves, including EQ, compression, and saturation.
- Apply your limiter and set final gain to hit your target loudness.
- Insert dither as the last plugin in the chain, sitting right before bit-depth conversion.
- Export or bounce, and confirm the file matches your intended bit depth.
- Check your export dialog settings for a hidden “dither” toggle that some DAWs enable by default.
Plenty of dither problems come from a plugin nobody remembered was there. Mastering limiters and format converters sometimes ship with dither switched on out of the box, sitting quietly in a signal chain that already has dither elsewhere.
Pro Tip: Before you trust any export, open your limiter’s settings panel and your export dialog separately. If both have a dither option checked, you’re stacking noise you don’t need.
Choosing A Dither Type: TPDF, Triangular, And Noise-Shaped
TPDF, or triangular probability density function dither, is the safe default for almost every export. It spreads quantization noise evenly across the frequency spectrum without coloring the sound, and it works reliably across genres and dynamic ranges.
Noise-shaped dither pushes that noise toward the upper frequencies, where your ears are least sensitive, making it the better pick for wide-dynamic, acoustic-heavy material like orchestral recordings or solo piano, where every bit of headroom in the audible range counts. Mat Leffler-Schulman’s Mastering Deep Dive recommends matching the curve to both the source material and the target bit depth, rather than defaulting to a single setting for everything.
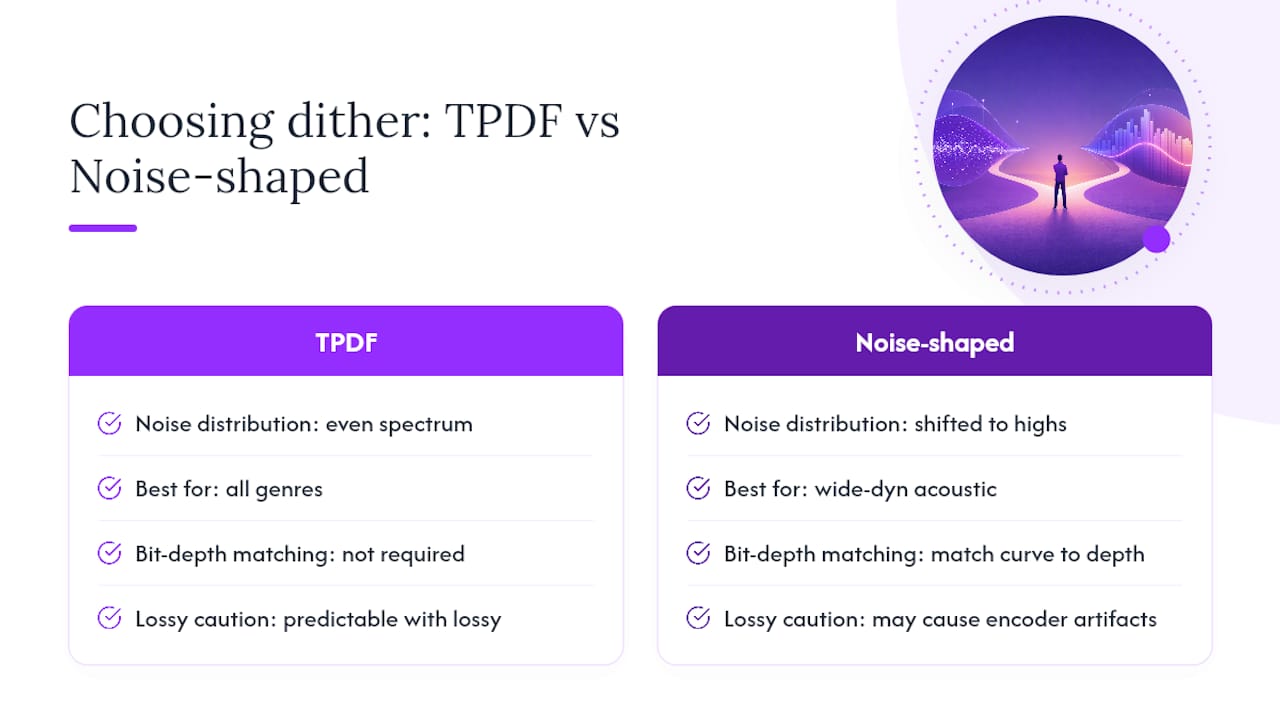
That said, be careful pairing noise-shaped dither with heavy lossy encoding downstream. Some noise-shaping curves interact poorly with MP3 or AAC encoders, producing artifacts the encoders weren’t designed to handle cleanly, a pattern Sweetwater’s engineers have documented. If your final delivery chain includes lossy compression, TPDF is usually the more predictable choice.
When You Can Skip Dithering Altogether
Working in 32-bit float? Skip it. Float formats have so much headroom that quantization noise from bit reduction doesn’t apply, and Violet Recording’s guide confirms there’s no benefit to adding it here.
The same goes for any export where the bit depth doesn’t change, say, bouncing 24-bit to 24-bit for a collaborator. No reduction means no quantization error to mask.
Interim bounces and mix stems fall into this category too. If you’re sending a rough mix to a mastering engineer or bouncing stems mid-project, hold off on dither entirely. Apply it only once, on the final deliverable, after every other decision is locked.
Common Mistakes And How To Catch Them
Double-dithering is the most common error, and it usually occurs when dithering is applied during an intermediate bounce and then again during the final export. Each pass adds its own noise layer instead of correcting anything, so the fix is simple: dither once, on the last file only, and audit every plugin in your chain first.
To hear the difference for yourself:
- Export two versions of the same passage, one dithered, one not, using identical settings otherwise.
- Normalize both files to the same reference level so volume doesn’t skew the comparison.
- Listen to quiet fades and low-level passages at a low monitoring volume, where quantization artifacts show up first.
- If a lossy-encoded version sounds worse than expected, re-export from your highest-resolution dithered master and try a different dither curve before assuming something else broke.
Publisher Notes: Where To Find Practical Export Settings
Getting dither placement right depends on having export controls that don’t hide what’s happening in your signal chain. Soundbridge supports high-fidelity processing up to 192kHz with export dialogs built for exactly this kind of precision work, so you can see and control bit-depth conversion instead of guessing.
If you want a guided walkthrough of the full export process, from gain staging through final bit-depth reduction, the Soundbridge mastering tutorial covers it step by step…
An Engineer’s Take On When Dither Actually Matters
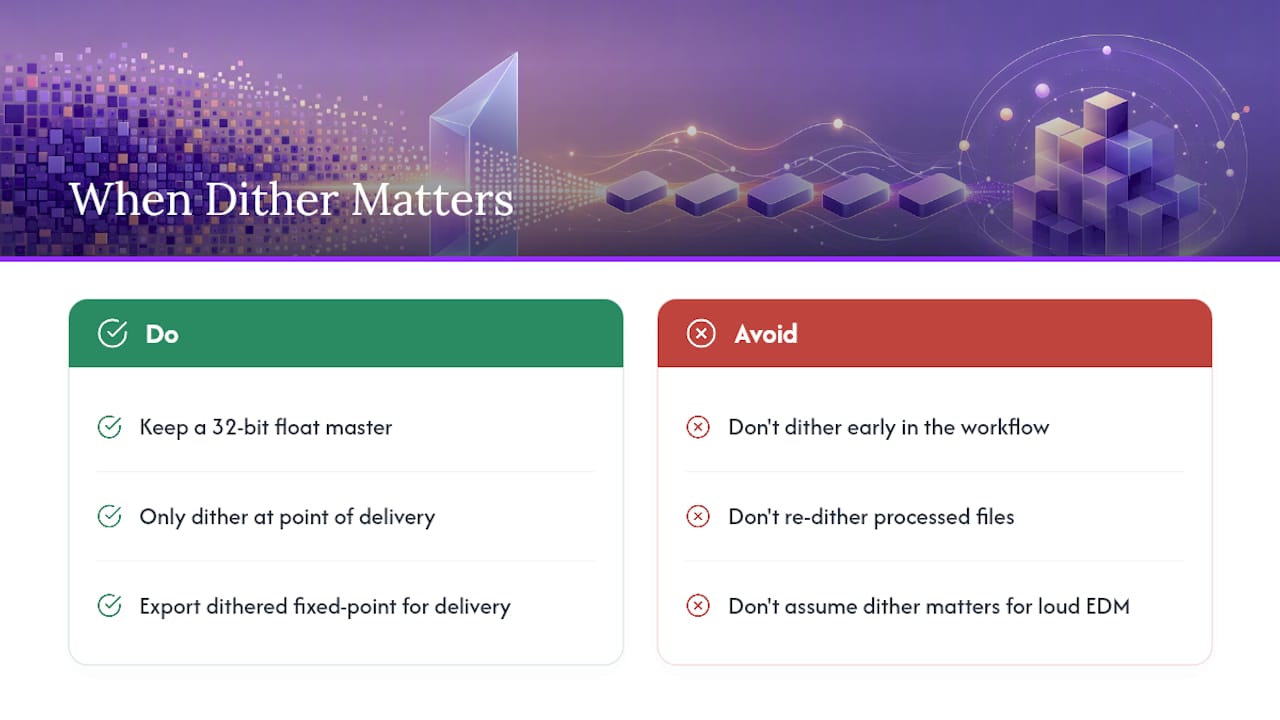
Dithering matters most on quiet, wide-dynamic material: classical, acoustic, ambient, anything with real silence between notes. That’s where quantization artifacts have room to show up. On a heavily compressed pop or EDM master sitting at -8 LUFS, the noise floor is already buried under so much signal that dither becomes a formality rather than an audible fix.
Here’s the rule that keeps you out of trouble either way: keep a 32-bit float master file untouched, and only generate dithered fixed-point exports at the point of delivery. That habit protects you from ever needing to re-dither, and it means you’re never stuck guessing whether a file further down your folder structure already got processed.
— Wake
Try SoundBridge For Master-Ready Exports
Some DAWs give you the export controls this whole process depends on: high-resolution processing up to 192kHz, visible bit-depth settings, and a signal chain where you can actually see what’s happening before you commit to a final bounce. That transparency is what keeps dither placement simple, rather than a guessing game buried in plugin defaults.

If you’re ready to put these steps into practice, start with the free version and run your own A/B test between a dithered and non-dithered export on a real mix. For a full walkthrough of gain staging, limiting, and final export order, the mastering tutorial covers the exact sequence this article recommends, and it’s the fastest way to see correct dither placement in action on a real project rather than in theory.
Sources
- What Is Dithering in Audio? | iZotope
- Can You Really Hear the Effects of Dithering? - Craig Anderton
- Dither in Mastering: A deep dive | Mat Leffler-Schulman
- What is Dithering? A Simple Guide | Violet Recording
FAQ
Should Dithering Be On Or Off By Default?
Off by default. Dithering should only be enabled when you’re reducing bit depth in a final export, and it should remain off for every intermediate bounce, stem, or 32-bit float file where no bit-depth reduction occurs.
Does Dithering Reduce Audio Quality?
No, dithering improves perceived quality when it’s needed, because it replaces harsh quantization distortion with a low, controlled noise floor that’s far less noticeable. Skipping it during a bit-depth reduction is what actually degrades quality, not adding it.
What Does Dither Mean In The Context Of Digital Audio?
Dither refers to a small amount of noise added during bit-depth reduction to mask quantization distortion in quiet passages and fades. Violet Recording’s guide describes it as a masking tool applied once, at the final export step.
What Does Dither Actually Do, And Why Use It?
Dither smooths out the stair-step distortion that appears when you truncate bits during a bit-depth reduction, particularly in low-level signals like reverb tails and fade-outs. Without it, those quiet passages can sound gritty or uneven instead of clean.
Can I Test Whether Dithering Made A Difference On My Export?
Yes. Export a dithered and non-dithered version of the same passage, normalize both to the same level, and listen to quiet fades at low volume, where quantization artifacts are easiest to hear.
Recommended
MASTER MUSIC PRODUCTION
Expert-led courses designed to take you from fundamentals to finished tracks.

HOUSEFrom bouncy bass and solid kicks, this course teaches you the most modern House music production techniques needed to succeed and stand out.

TRAPQuit sounding like generic Trap and produce something World with hints of the Far East. Create ethnic soundscapes to put your Trap ahead of the curve.

AMBIENTProduce relaxing, sophisticated psy-influenced ambient. Psychedelic and relaxing to listen to, create meditative soundscapes to put your listeners in Zen.