Elevate Your Sound Design: Step-By-Step Tutorial
Last Edited: May 21, 2026
Every producer hits that wall. You open your DAW, scroll through presets, and nothing feels original. Your tracks sound like everyone else’s because you’re pulling from the same library of ready-made sounds. The good news? Breaking free from that cycle is absolutely within your reach. This tutorial walks you through a proven, step-by-step approach to building sounds from scratch, layering them with purpose, and processing them into something genuinely yours. Whether you’re working in Ableton Live, Logic Pro, or SoundBridge, these methods will sharpen your ear and expand your creative toolkit fast.
Key Takeaways
| Point | Details |
|---|---|
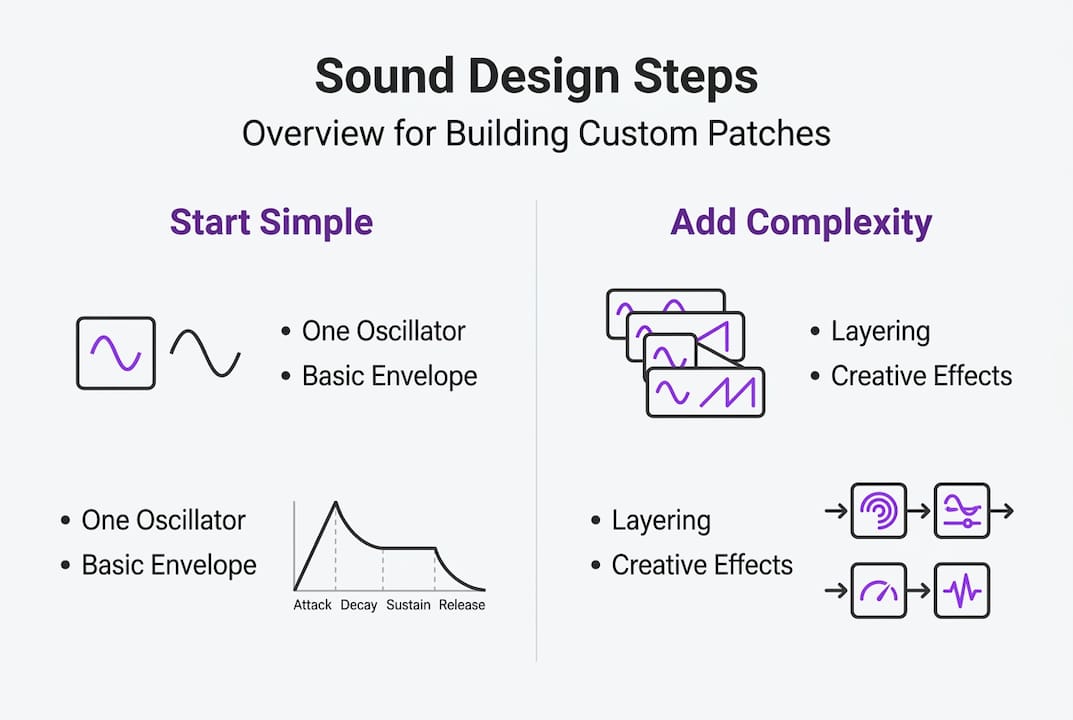
| Start simple | Build from a basic patch and add complexity in stages to create clear, original sounds. |
| Layer and resample | Stacking and processing sounds with effects and iterative resampling gives more character and variety. |
| Troubleshoot effectively | Testing, tweaking, and solving issues during design ensures your sounds fit perfectly in a mix. |
| Experiment with synthesis | Physical modeling and spectral tools add new textures unavailable from classic synths. |
| Dedicate focused sessions | Separate sound design from production time to fuel greater creativity and innovation. |
What You Need for Effective Sound Design
Before you touch a single oscillator, make sure your setup is dialed in. Good sound design demands that you actually hear what you’re creating, so accurate monitoring is non-negotiable.
Essential hardware:
- Studio headphones (closed-back for isolation, open-back for mixing) or near-field monitors
- Audio interface with low-latency drivers
- MIDI controller (optional but highly recommended for real-time parameter control)
- A quiet, acoustically treated space, even basic foam panels, helps
Software you’ll need:
- A capable DAW: Ableton Live, Logic Pro, or SoundBridge all work beautifully
- Core synths for synthesis variety (more on these below)
- Processing plugins: a good saturator, reverb, and delay are your core toolkit
Here’s a quick reference for the synths covered in this tutorial:
| Synth | Synthesis type | Best for | DAW |
|---|---|---|---|
| Wavetable | Wavetable/subtractive | Leads, pads, basses | Ableton Live |
| Sculpture | Physical modeling | Organic, plucked textures | Logic Pro |
| Alchemy | Additive/spectral | Evolving pads, morphing timbres | Logic Pro |
| Serum | Wavetable | Modern electronic sounds | Any DAW |
As a mindset note: start patches from scratch with Wavetable by selecting oscillator waveforms, sculpting with filters, adding LFOs, layering sounds, and then resampling. That workflow alone will teach you more in a week than months of preset browsing.
Preparation mindset matters too. Dedicate focused sessions purely to sound design, separate from your song-building sessions. When you mix both tasks, neither gets your full attention. Treat sound design like a craft practice, not an afterthought.
Building Your First Custom Patch: Step-By-Step
With everything ready, here’s how to start crafting your own original sound, one step at a time.
-
Choose your starting waveform. A sine wave gives you a clean sub with no harmonics. A sawtooth wave is rich and bright, perfect for leads and basses. Start with just one oscillator so you can clearly hear every change you make.
-
Shape the tone with your filter. Open a low-pass filter and slowly sweep its cutoff frequency. Notice how rolling off the high end makes the sound warmer and more contained. Add a touch of resonance (around 20-40 percent) to give the filter a slight edge at the cutoff. Too much resonance gets harsh fast, so use your ears.
-
Set your amplitude envelope. The ADSR (Attack, Decay, Sustain, Release) envelope controls how your sound behaves over time. For a punchy bass, use a fast attack, short decay, low sustain, and medium release. For a pad, slow the attack and extend the release. This single step transforms a flat tone into something expressive.
-
Add LFO movement. Route a low-frequency oscillator (LFO) to the filter cutoff for a classic wobble, or to the pitch for subtle vibrato. Keep the LFO rate slow for ambient textures, faster for rhythmic movement. Even a tiny amount of LFO modulation makes a sound feel alive.
-
Layer your components. Once your main tone is solid, add a sublayer (a sine wave pitched down an octave) for weight, and a noise layer (white or pink noise, high-pass filtered) for air and texture. Layering sounds this way adds dimension to your patch without cluttering the frequency spectrum.
-
Tweak and document. Change one parameter at a time and listen carefully. This builds your intuition faster than any tutorial can.
Pro Tip: Prioritize starting simple with a single oscillator and basic envelope before adding complexity. Iterative resampling builds a level of uniqueness that stock sounds cannot match. Think of it as sculpting: rough shape first, fine details later.
Want to apply this to specific contexts? Check out how these principles work for making unique vocal sounds or building expressive lead patches.
Moving Beyond Basics: Layering, Effects, and Resampling
Once you have your basic patch, take your sound to the next level with layered elements and creative processing.
Layering is where your sound design starts to develop real personality. The goal is to combine complementary elements, each occupying a different role in the frequency spectrum.
Key layering components:
- Sub layer: Sine wave, pitched low, provides the foundational weight
- Main layer: Saw or square wave with filter shaping, carries the character
- Noise/texture layer: Filtered noise or a short sample adds realism and air
- Harmonic layer: A detuned copy of the main oscillator, slightly panned, adds width
After layering, process with effects including saturation, reverb, and delay for further manipulation. Saturation adds harmonic warmth and helps sounds cut through a mix. Reverb places your sound in a space. Delay adds rhythmic depth and movement.
Here’s how a solo workflow compares to a collaborative approach:
| Aspect | Solo producer | Collaborative session |
|---|---|---|
| Speed of iteration | Slower, more deliberate | Faster with real-time feedback |
| Creative direction | Fully self-directed | Shaped by multiple perspectives |
| Sound consistency | Easier to maintain a signature style | Requires clear communication |
| Resampling workflow | Fully flexible | Needs shared session management |
Resampling is one of the most powerful and underused techniques in sound design. Record your processed patch back into your DAW as audio, then treat that recording as raw material. Apply new effects, warp it, reverse it, or pitch it down. Extreme warping in Ableton using Beats, Tones, or Texture modes creates risers, drones, and granular textures that feel completely original. Multiple resampling passes stack uniqueness in ways that no preset can replicate.
Pro Tip: After resampling, try controlling transients with multiband processing to tighten or loosen the attack of your resampled audio. This gives you surgical control over how your sound hits in a mix.
For percussion-heavy applications, the same layering logic applies. Building a massive tom sound follows the same sub, body, and transient layering approach described here.
Troubleshooting and Optimizing Your Sounds
Creating advanced sounds can introduce challenges. Here’s how to spot and solve issues for polished results.
Common problems and fixes:
- Muddiness: Too much low-mid energy from multiple layers clashing. High-pass filter each layer back to its natural starting point, and use EQ to carve out space.
- Phase cancellation: When two layers cancel each other out, the sound gets thin. Check mono compatibility and use a phase alignment tool if needed.
- Clashing harmonics: Layers that share the same harmonic content fight for space. Detune one slightly or filter its high end to differentiate them.
- Over-processing: Adding too many effects kills the original character. Every plugin in your chain should have a clear reason for being there.
- Skipping gain staging: Letting levels clip inside your signal chain introduces unwanted distortion. Keep each stage at a healthy level before moving to the next.
“Reverse-engineer presets by tweaking one parameter at a time, dedicate sound design sessions separate from production, and use extreme warping for sound design.” This single habit, separating sound design sessions from your production workflow, is one of the fastest ways to improve your ear and your output simultaneously.
Testing your sound in context is critical. A patch that sounds incredible in solo can disappear in a full mix or clash with your kick and bass. Always A/B your new sound against a reference track at matched levels. Solo it, then unsolo it. If it holds up in both contexts, you’ve got a keeper.
Another powerful learning method: take a preset you admire and start turning knobs one at a time. Notice what each parameter does to the overall character. This reverse-engineering approach builds music production insights faster than reading theory alone, because you’re learning by feel and by ear.
Using Physical Modeling and Spectral Tools for Unique Results
For those wanting to go deeper, modern DAWs offer physical modeling and spectral tools that yield truly innovative sounds.
Physical modeling synthesis simulates the physical behavior of real instruments. Instead of drawing waveforms, you’re modeling how a string vibrates, how a body resonates, or how a bow interacts with a surface. The results are organic, dynamic, and impossible to replicate with standard subtractive synthesis.
Logic Pro’s Sculpture is the gold standard for physical modeling in a DAW. You can create morph pads that evolve, use envelopes for rhythmic timbral changes, and blend between different material types (nylon, steel, glass) to craft sounds that feel genuinely alive. Sculpture for physical modeling offers morph pads and envelopes for rhythmic changes, while Alchemy handles additive and spectral synthesis from scratch, combining multiple engines for hybrid results.
Alchemy takes a different approach. It lets you import audio and resynthesize it using additive, spectral, or granular engines. You can morph between four different sound sources, creating evolving textures that shift and breathe in ways that feel almost alive. This is the tool for ambient pads, cinematic textures, and sounds that defy easy categorization.
| Tool | Method | Ideal use case | Unique advantage |
|---|---|---|---|
| Sculpture | Physical modeling | Organic, plucked, bowed sounds | Realistic material simulation |
| Alchemy | Additive/spectral/granular | Evolving pads, morphing textures | Multi-engine morphing |
| Wavetable | Wavetable scanning | Modern electronic leads and basses | Precise harmonic control |
Pro Tip: In Alchemy, import a simple vocal sample and resynthesize it using the spectral engine. Then morph it with a pad source. The result is a hybrid texture that sounds like nothing in any preset library. This is the kind of sound design that makes listeners stop and ask, “What is that?”
When should you reach for these tools? Use physical modeling when you want sounds that feel acoustic or tactile. Use spectral synthesis when you want textures that evolve and breathe. Use subtractive synthesis when you want tight, controlled electronic tones. Knowing which tool to reach for is half the battle.
Why Simplicity and Dedicated Sessions Unlock Your Best Sound Design
Here’s the uncomfortable truth most tutorials skip: complexity is not the goal. More layers, more effects, and more modulation do not equal a better sound. In fact, the most memorable patches in electronic music history are often built on shockingly simple foundations.
The producers who consistently create standout sounds share one habit. They start with a single oscillator and a basic envelope, and they stay there until they’ve squeezed every ounce of character out of that simple signal. Only then do they add a second element. This approach forces you to hear exactly what each parameter does, building an intuition that no amount of preset browsing can replicate.
Dedicated sound design sessions separate from production are equally critical. When you’re building a track and designing sounds at the same time, you’re constantly context-switching. Your creative brain is trying to serve two masters. The result is usually mediocre on both fronts. But when you sit down with the sole intention of designing sounds, something different happens. You experiment more freely. You follow strange ideas. You end up somewhere unexpected.
Iterative resampling compounds this effect. Each pass through your effects chain and back into audio creates a new layer of character. After three or four passes, your sound has a history. It carries the marks of every decision you made. That’s what makes it yours. No two producers will arrive at the same place starting from the same sine wave, because the journey itself shapes the destination.
The takeaway: resist the urge to add more. Simplify first, then layer with intention. Your best sounds are probably one focused session away.
Ready to Power Up Your Sound Design?
You now have a complete, actionable framework for building original sounds from scratch, layering them with purpose, and processing them into something that stands out in any mix. The next step is to put these techniques into practice in a DAW built to support your creative ambition.
SoundBridge gives you zero-latency recording, high-fidelity audio processing up to 192kHz, and a workflow designed to keep your creative momentum moving. Whether you’re crafting ambient textures, designing punchy synth leads, or scoring for picture, SoundBridge has the tools to match your vision. Explore the unique vocal sounds guide to apply these same principles to voice, or sharpen your mix with the multiband processing tutorial to get your layered sounds sitting perfectly in any track.
Frequently Asked Questions
What DAW is best for learning sound design?
Ableton Live and Logic Pro are both excellent choices due to their intuitive interfaces, built-in synths, and advanced processing tools. Ableton’s Wavetable and Logic’s Sculpture give you immediate access to multiple synthesis types without needing third-party plugins.
How can I avoid all my sounds sounding the same?
Start with basic patches, layer with effects and resampling, and dedicate separate sessions to experimentation. Starting simple and iterative resampling consistently produces more original results than stacking preset layers.
What’s the quickest way to learn sound design?
Reverse-engineering presets by tweaking parameters one at a time builds a rapid understanding of how synthesis works. Reverse-engineering presets one parameter at a time is one of the fastest paths to developing a trained ear.
Which plugins or synths should I start with?
Wavetable synths, Sculpture, and Alchemy cover the main types of synthesis and are excellent starting points. Wavetable, Sculpture, and Alchemy together provide subtractive synthesis, physical modeling, and spectral synthesis in a single workflow.
Recommended
MASTER MUSIC PRODUCTION
Expert-led courses designed to take you from fundamentals to finished tracks.

HOUSEFrom bouncy bass and solid kicks, this course teaches you the most modern House music production techniques needed to succeed and stand out.

TRAPQuit sounding like generic Trap and produce something World with hints of the Far East. Create ethnic soundscapes to put your Trap ahead of the curve.

AMBIENTProduce relaxing, sophisticated psy-influenced ambient. Psychedelic and relaxing to listen to, create meditative soundscapes to put your listeners in Zen.