

LUFS Explained: The Producer's Guide to Loudness
Last Edited: Jul 20, 2026
LUFS (Loudness Units relative to Full Scale) is the standardized audio metric that reflects how humans actually perceive loudness, not just raw electrical signal peaks. Defined by ITU-R BS.1770 and EBU R128, LUFS uses psychoacoustic frequency weighting and gating to give you a measurement that matches what your ears actually hear. Streaming platforms including Spotify, Apple Music, and YouTube all normalize audio to LUFS targets, which means your mastering decisions directly affect how your music plays back for listeners worldwide. Getting LUFS explained clearly is the first step toward making masters that translate everywhere.
How LUFS Measurement Works
LUFS measures loudness through three distinct time windows, each serving a different purpose in your workflow:
- Momentary LUFS captures a 400ms window. Use it to catch sudden loud transients and identify peaks in real time during playback.
- Short-term LUFS averages over a 3-second window. This is your go-to for monitoring loud sections, choruses, or drops without losing sight of the bigger picture.
- Integrated LUFS averages the full program from start to finish using a gating algorithm that excludes silence and very quiet passages. This is the number streaming platforms use for normalization.
The K-weighting filter at the heart of LUFS is what separates it from older metering methods. It applies a high-shelf boost to emphasize mid and high frequencies, where human hearing is most sensitive, and a high-pass filter to de-emphasize deep sub-bass below 60Hz. The result is a reading that correlates closely with how loud something actually sounds to a listener, not just how much electrical energy the signal carries.
Gating is the other critical piece. Without it, long stretches of silence or near-silence on a track would artificially drag down the Integrated LUFS reading. The gating algorithm in ITU-R BS.1770 ignores any block of audio that falls more than 10 LU below the ungated average, keeping the measurement honest and consistent across different track lengths and arrangements.
Pro Tip: Never measure Integrated LUFS on a loop or a segment. Run the full program from the very first sample to the last, with gating active, to get the number that streaming platforms will actually see.
LUFS vs RMS: What Is the Real Difference?
RMS (Root Mean Square) and LUFS both describe average signal level, but they measure very different things. RMS measures raw signal power without any frequency weighting or gating. That makes it useful for gain staging inside your session, where you want to know how much energy a track carries regardless of its tonal content.
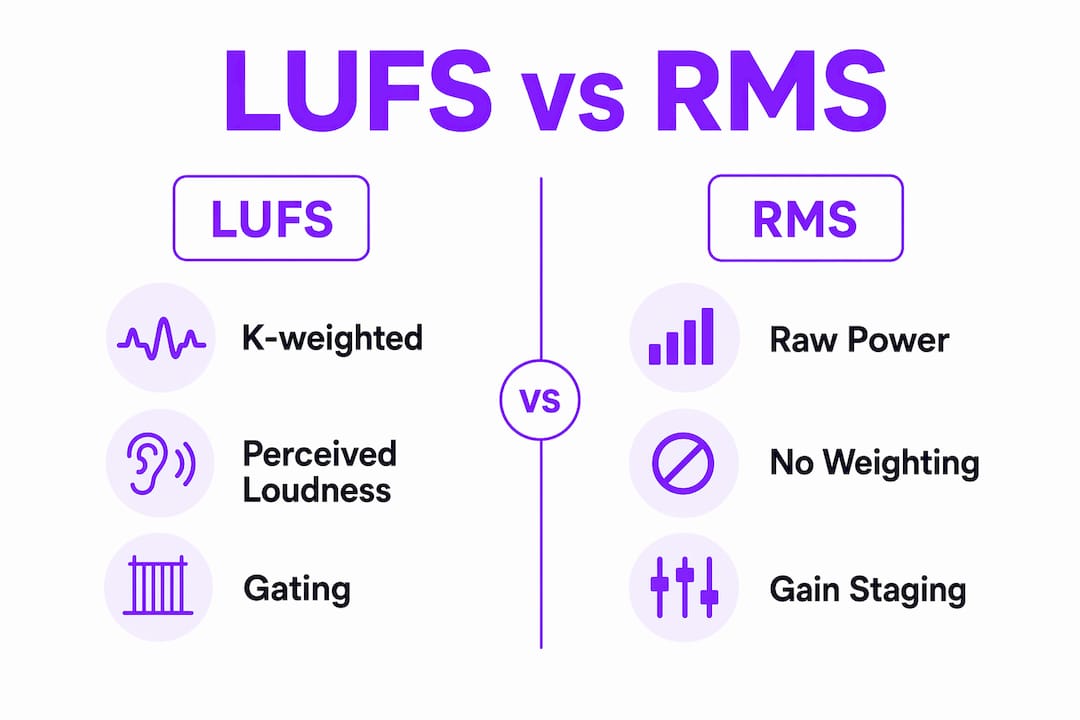
LUFS applies K-weighting and gating on top of that power calculation. The result reflects perceived loudness rather than raw energy. A bass-heavy mix and a bright, mid-forward mix can read identically on an RMS meter but sound dramatically different in perceived volume. LUFS accounts for that difference.
Here is where producers get tripped up:
- RMS is a mixing tool. Use it during gain staging to keep individual tracks and buses at consistent levels before you reach the mastering stage.
- LUFS is a delivery tool. Use it at the end of your chain to confirm your master meets platform or broadcast requirements.
- They are not interchangeable. A track that reads -14 RMS is not the same as a track that reads -14 LUFS. The numbers can be close or far apart depending on the audio's frequency content and dynamic structure.
Different loudness metrics serve different phases of production. Treating LUFS as your only metering tool during mixing, or using RMS as your final delivery check, introduces errors that no amount of limiting can cleanly fix.
Pro Tip: Keep an RMS meter on your master bus during mixing for gain staging reference. Switch to a dedicated LUFS meter only when you are evaluating the finished master for delivery.
Loudness Normalization Targets Across Platforms and Genres
Streaming platforms normalize audio to specific Integrated LUFS targets. If your master is louder than the target, the platform turns it down. If it is quieter, some platforms turn it up, within true peak safety limits. Knowing these targets is non-negotiable for professional delivery.
| Platform / Standard | Integrated LUFS Target | True Peak Limit |
|---|---|---|
| Spotify | -14 LUFS | -1 dBTP |
| Apple Music | -16 LUFS | -1 dBTP |
| YouTube | -14 LUFS | -1 dBTP |
| Amazon Music | -14 LUFS | -2 dBTP |
| EBU R128 (broadcast) | -23 LUFS | -1 dBTP |
| ATSC A/85 (US broadcast) | -24 LKFS | -2 dBTP |
Genre-specific targets vary significantly. Pop, hip-hop, and EDM masters typically land between -10 and -12 LUFS, reflecting the genre's expectation for density and energy. Classical and jazz recordings often target -16 to -18 LUFS or quieter, preserving the wide dynamic range that defines those listening experiences. Podcast platforms, including Apple Podcasts, generally target an integrated level of -16 LUFS for consistent playback across episodes.
The critical implication of normalization is this: mastering louder than the platform target gives you zero playback advantage. Chasing loudness beyond platform targets only crushes your dynamics, and the platform turns the result down anyway. The loudness war is effectively over for streaming delivery. What matters now is how good your master sounds at the target level, not how loud you can push it.
True peak limits deserve equal attention. True peak meters measure inter-sample peaks that standard peak meters miss entirely. When your audio converts to a lossy codec like MP3 or AAC, those inter-sample peaks can exceed 0 dBFS and cause audible distortion. Setting your true-peak ceiling to -1 dBTP is standard practice that prevents this problem.
How to Measure and Master to LUFS Standards
Measuring LUFS correctly requires a specific workflow. Skipping any of these steps produces unreliable readings that will not accurately predict platform normalization.
- Measure the full program. Integrated LUFS must be measured from the first sample to the last with gating active. Partial measurements or loop-based readings are unreliable for delivery purposes.
- Monitor Short-term LUFS during loud sections. Watch your choruses, drops, and climaxes with the 3-second window. If Short-term LUFS spikes far above your Integrated target, you may be crushing those sections unnecessarily with your limiter.
- Set your true peak ceiling before you limit. Configure your true peak limiter to -1 dBTP or -2 dBTP before you start adjusting loudness. This protects against codec distortion regardless of the final LUFS reading.
- Reference genre tracks. Measure the Integrated LUFS of two or three reference tracks in your genre. Genre and platform context shape mastering targets more than any fixed number. Your reference tracks tell you what the genre actually sounds like at delivery.
- Account for sub-bass limitations. The K-weighting filter de-emphasizes sub-bass frequencies below 60Hz. EDM and bass-heavy productions can read lower on a LUFS meter than they sound in physical space. Complement your LUFS reading with RMS monitoring and subjective listening on a system with real low-end extension.
- Use LUFS as a delivery check, not a creative goal. Make your loudness decisions based on how the master sounds. Then check the Integrated LUFS reading to confirm it falls within the delivery window. The meter confirms your work. It does not drive it.
A solid audio mastering workflow starts with a well-balanced mix. No amount of LUFS targeting fixes a mix that lacks clarity or proper gain staging. Get the mix right first, then use LUFS metering to confirm your master is ready for distribution.
How LUFS Applies to Broadcasting, Podcasting, and Other Media
Broadcast loudness compliance is legally enforced in many markets. The CALM Act in the United States mandates that television commercials cannot be louder than the programs they accompany, with the ATSC A/85 standard setting the target at -24 LKFS. European broadcasters follow EBU R128 at -23 LUFS, with a delivery tolerance of ±0.5 LU. These are not recommendations. Failing to meet them results in rejected deliverables.
Broadcast standards also define Loudness Range (LRA), which describes the dynamic variation across a program. LRA is not a compliance target but a quality indicator. Overly compressed content with a very low LRA causes listener fatigue, particularly in long-form broadcast and streaming contexts. Preserving appropriate LRA is part of delivering professional-grade audio, not just hitting a number.
Podcasting sits between music streaming and broadcast in terms of requirements:
- Apple Podcasts targets -16 LUFS integrated for consistent playback.
- Podcast content benefits from more dynamic range than heavily compressed music masters.
- Normalization in podcast apps means over-compressed episodes sound no louder than well-produced ones, rewarding quality over brute-force limiting.
- Professional sound engineering for live and recorded audio events follows similar loudness principles, applying LUFS-aware metering to ensure consistent audience experience across venues and formats.
The common thread across all these contexts is that LUFS normalization rewards dynamic, well-crafted audio. Whether you are delivering a film score, a podcast episode, or a club track, the platform or broadcaster will normalize your content to a target level. Your job is to make sure it sounds its best at that level.
Key Takeaways
LUFS is the definitive end-of-chain loudness metric for modern audio delivery, combining K-weighting, gating, and time-windowed measurement to reflect perceived loudness across streaming, broadcast, and podcast platforms.
| Point | Details |
|---|---|
| LUFS reflects perceived loudness | K-weighting and gating make LUFS more accurate than RMS for delivery decisions. |
| Three measurement modes serve different needs. | Use Momentary for transients, Short-term for sections, and Integrated for final delivery checks. |
| Platform targets vary by service. | Spotify and YouTube target -14 LUFS; Apple Music targets -16 LUFS; broadcast standards go to -23 or -24 LUFS. |
| True peak limits prevent codec distortion. | Set your true-peak ceiling to -1 dBTP before limiting to avoid artifacts in MP3 and AAC formats. |
| Genre context overrides fixed targets. | Measure reference tracks in your genre to set realistic loudness goals rather than chasing platform numbers unthinkingly. |
Why the Loudness Race Was Always the Wrong Race
The most common mistake I see producers make is treating LUFS as a competition. They see a reference track reading -8 LUFS and immediately want to match it, not realizing that the track was mastered before normalization became universal, or that it sounds crushed on every modern platform because it gets turned down to -14 LUFS anyway.
The real skill is making your master sound powerful, clear, and genre-appropriate at the platform's target level. That means preserving transient punch, maintaining a healthy LRA, and trusting your ears over your meters. LUFS is a checkpoint, not a trophy.
I have also seen the opposite mistake: producers who are so afraid of over-limiting that they deliver masters at -18 or -20 LUFS, thinking "quieter is safer." Some platforms do turn quiet masters up, and if your true peak headroom is not set correctly, that upward normalization can push inter-sample peaks into distortion territory. The answer is not to go louder or quieter unthinkingly. The answer is to understand what the meter is telling you and respond with intention.
RMS and LUFS together give you the full picture. Neither metric alone is enough. Use them as complementary tools, and you will make better decisions at every stage of production. The compression techniques you apply during mixing directly shape both readings, which is why loudness awareness needs to start at the mix stage, not just at mastering.
— Wake
SoundBridge and LUFS-Aware Production
SoundBridge is built for producers and engineers who take their signal chain seriously. The platform supports high-fidelity audio processing at up to 192kHz sample rates, giving you the resolution to make accurate loudness decisions at every stage of your workflow.

Whether you are mixing a dense EDM track, mastering a podcast series, or scoring a film, SoundBridge gives you the tools to monitor loudness in real time and deliver masters that meet platform and broadcast standards. The integrated workflow combines mixing, editing, and mastering in a single environment, so you never lose context when you switch from creative decisions to technical delivery checks. If you are ready to build a production environment that supports professional loudness standards, the SoundBridge DAW guide is the place to start.
FAQ
What does LUFS stand for?
LUFS stands for Loudness Units relative to Full Scale. It is the standard unit for measuring perceived audio loudness as defined by ITU-R BS.1770 and EBU R128.
What is the difference between LUFS and RMS?
RMS measures raw signal power without frequency weighting, making it useful for gain staging. LUFS applies K-weighting and gating to reflect perceived loudness, making it the correct metric for final delivery.
What LUFS should I master to for Spotify?
Spotify normalizes audio to -14 LUFS integrated. Masters louder than this target are automatically turned down, so mastering beyond -14 LUFS provides no playback advantage and typically reduces dynamic quality.
How do I measure Integrated LUFS correctly?
Run your LUFS meter across the full audio program from the first sample to the last with gating active. Partial or looped measurements do not produce reliable Integrated LUFS readings for platform delivery.
Why does my EDM track read lower LUFS than it sounds?
The K-weighting filter in LUFS de-emphasizes sub-bass frequencies below 60Hz. Bass-heavy productions can read lower on a LUFS meter than they sound physically, so complement your LUFS reading with RMS monitoring and subjective listening on a full-range system.
Recommended
MASTER MUSIC PRODUCTION
Expert-led courses designed to take you from fundamentals to finished tracks.

HOUSEFrom bouncy bass and solid kicks, this course teaches you the most modern House music production techniques needed to succeed and stand out.

TRAPQuit sounding like generic Trap and produce something World with hints of the Far East. Create ethnic soundscapes to put your Trap ahead of the curve.

AMBIENTProduce relaxing, sophisticated psy-influenced ambient. Psychedelic and relaxing to listen to, create meditative soundscapes to put your listeners in Zen.