

MIDI Clock Sync: The Complete Guide to Perfect Timing
Last Edited: Aug 31, 2026
MIDI clock sync locks the tempo of all connected devices to a single master source using a 24-PPQN beat signal. The immediate fix for most setups: pick one stable master, whether that’s your DAW or a dedicated hardware clock, and connect everything else as slaves through a multiport MIDI interface or a USB-MIDI hub. Watch for jitter and latency along the way. They’re the two gremlins that cause most drift, and both respond well to offset and smoothing adjustments.
TL;DR:
- Using a dedicated hardware master clock is recommended for larger setups to prevent timing issues caused by signal delays in daisy-chained devices.
- Running MIDI clock on a high-quality, powered USB hub or direct port minimizes jitter and missed beats caused by signal noise or latency.
- Regularly testing synchronization with audible metronome clicks and loopback methods helps identify drift, offset, or stutter problems early.
- Saving detailed sync templates with port configurations and offsets simplifies recall and reduces setup time before gigs or sessions.
- Pairing MIDI clock with a stable word clock ensures both timing precision and audio sample rate consistency across studio hardware.
What Is MIDI Clock Sync and How Does It Work?
MIDI clock runs on a simple but rigid math: 24 pulses per quarter note, or 24 PPQN. That number never changes, but the speed of those pulses does. Speed up the tempo, and the pulses fire faster. Slow it down, and they stretch out. This is why MIDI clock is described as tempo-dependent rather than absolute.
The protocol leans on a handful of tiny, fast real-time messages:
- Clock (0xF8): the actual pulse, sent 24 times per quarter note
- Start: tells all slaves to begin playback from the top
- Stop: halts every connected device simultaneously
- Continue: resumes playback from wherever it stopped, rather than restarting
- Song Position Pointer (SPP): tells devices where in the song they should be, so a slave can jump to bar 33 without playing through bars 1 through 32 first
One device acts as master and broadcasts these messages. Everything else listens and follows. If the master stops sending, the slaves stop cold. That single dependency is worth remembering: your whole rig is only as stable as whatever you designate the master.
Basic Setup: Cables, Ports, and Choosing the Master
Before you sync anything, you need a physical or virtual path for clock data to travel. Three common options cover almost every studio and stage:
- Standard DIN MIDI cables: the classic 5-pin connection, still reliable for simple two- or three-device chains.
- USB-MIDI: most modern interfaces and controllers use it, often bundling multiple virtual ports over a single cable.
- Multi-port interfaces: hardware boxes with four, eight, or more independent MIDI outputs, built for rigs with several synths, drum machines, or sequencers.
Once cabled, the DAW side is nearly identical across platforms. Open your MIDI or sync preferences, enable “MIDI Clock Out” or “Send MIDI Clock” on the port connected to your hardware, then set each receiving device to “External Sync” or “Slave” mode. Logic Pro even lets you enable clock output for each individual port and apply a clock delay to each device separately, which matters when you’re compensating for real-world timing quirks.
Deciding whether the DAW or a piece of hardware should be master depends on your setup. A DAW-as-master works well in the studio, where per-port delay compensation smooths out small discrepancies. Live rigs often lean toward a dedicated hardware master clock, since it removes a layer of software dependency, where a computer crash would otherwise take down the whole rig.
Pro Tip: Label every MIDI cable at both ends with its port number before a gig. Five minutes with a marker saves twenty minutes of crawling behind a rack trying to figure out which cable feeds which synth.
Syncing Multiple Devices: Routing, Interfaces, and Scaling
Two devices are easy. Six devices are where things get interesting. Daisy-chaining DIN cables through multiple units’ MIDI Thru ports technically works, but each hop adds a small delay, and by the fourth or fifth device in the chain, that accumulated lag becomes audible drift.
The fix scales with your rig size:
- Small setups (two to three devices): a simple daisy chain or a basic two-port interface is fine.
- Medium setups (four to eight devices): step up to a multi-port USB-MIDI interface so each device gets its own direct clock feed rather than sharing one.
- Large or permanent rigs: a dedicated master clock generator, paired with a MIDI thru box, distributes clock to everyone at once without routing it through any single instrument.
Merge boxes solve a different problem: combining clock and note data from multiple sources into a single stream. Thru boxes solve the opposite one, splitting a single clock source out to many destinations without degradation. Before buying gear, count your actual output needs and add two spare ports. Rigs grow faster than budgets do.
Common Timing Problems and How to Fix Them
Drift, missed beats, and start/stop errors account for the vast majority of MIDI clock sync complaints, and each one points to a specific culprit.
- Gradual drift over a long track: usually a clock jitter issue, often from a cheap or oversaturated USB hub. Swap to a powered, high-quality hub or move the device to a direct port.
- Devices start a fraction of a second late or early: a fixed-offset problem. Most DAWs, including Renoise, have offset sliders that nudge a device’s timing forward or backward in small increments until it locks in.
- Occasional missed beats or stutters during tempo changes: a smoothing issue. Smoothing controls trade a little responsiveness for stability, which is usually the right trade during a live tempo ramp.
- One device ignores Start/Stop but follows Continue: check that it’s actually set to receive transport messages, not just clock pulses. Some hardware separates the two settings.
To diagnose any of this, run a simple test: put an audible metronome click on your master and another on the slave, then listen for drift over sixty seconds. Sweetwater’s testing approach also recommends a loopback test, sending the clock out and back into the same interface, to determine whether the problem lies with your cabling or the device itself.
Pro Tip: If a device randomly loses sync mid-song, try relocating with Song Position Pointer instead of a hard Stop/Start. SPP repositions everything without forcing a full transport reset, thereby sidestepping much of the flaky reconnection behavior.
MIDI Clock vs. MTC/SMPTE vs. DIN Sync: Which One Do You Need?
MIDI clock and timecode solve different problems, and mixing them up wastes hours. MIDI clock is tempo-based: it tells devices how fast to play, and it stretches or compresses with tempo changes. SMPTE and MIDI Time Code (MTC) are absolute: they reference a fixed point in real time, regardless of tempo, which is exactly what film scoring and video-locked sessions need.
Use each where it fits:
- MIDI clock: sequencer and arpeggiator tempo sync, drum machines, modular gear, live tempo-matched playback.
- MTC/SMPTE: film scoring, video post-production, any session where a hit point must land on an exact timecode frame regardless of tempo drift.
- DIN sync (old-school Roland/Korg style): largely legacy now. If you’re running vintage gear that only speaks DIN sync, USB-MIDI conversion boxes handle the bridge fine for modern setups.
For readers scoring to picture, syncing audio to footage requires that absolute timecode reference, not a tempo-based clock.
Live and Studio Best Practices for Reliable Sync
A pre-show checklist catches ninety percent of sync failures before they become an on-stage emergency:
- Confirm a failover plan: if your primary master fails, know which device becomes master in seconds, not minutes.
- Label every cable at both ends, not just one.
- Save a template with sync settings baked in, so a soundcheck configuration survives a power cycle.
- Test Start/Stop and Continue from every controller that might trigger transport, not just the main one.
For live rigs, latency choices matter more than they do in the studio. USB hubs and cheap interfaces introduce small delays that stack up; a direct connection or a dedicated master clock device sidesteps that stacking almost entirely.
Session recall deserves its own habit. Document your port mapping (which device sits on which port) in a simple text file or spreadsheet alongside your project file. Six months later, when you reopen that session, you won’t be guessing which synth was on port 3.
Pro Tip: Keep a spare, pre-tested MIDI cable and a backup USB hub in your gig bag. Sync failures are rarely dramatic. They’re usually a $5 cable that finally gave out.
How SoundBridge Supports Reliable MIDI Clock Workflows
A modern DAW can absolutely act as your master clock, and the features that make that reliable are the same ones that make remote collaboration work. SoundBridge handles MIDI routing across multiple ports natively, which means you can assign clock output per device without juggling separate utility software.
A few specifics worth knowing:
- Zero-latency remote tracking keeps timing tight even when collaborators are recording from different locations, a real advantage over setups where added latency compounds with existing MIDI jitter.
- Bi-directional hardware control lets connected gear talk back to the DAW, which is useful for confirming that a device actually received Start or Continue.
- Saved session templates preserve your sync settings, port assignments, and offsets, so you’re not rebuilding your MIDI clock configuration from scratch every session.
For producers who split work between a home studio and a live rig, that template recall alone saves real setup time. Explore SoundBridge’s remote collaboration features to see how synchronization extends beyond a single room.
Advanced Troubleshooting for Persistent Sync Issues
When the basic fixes (offset, smoothing, better cables) don’t resolve a stubborn sync problem, the issue usually lives one layer deeper than most people check first.
Start by isolating the transport layer from the clock layer. A device can receive clock pulses perfectly while still ignoring Start, Stop, or Continue messages because those are separate message types. Test each independently: send the clock alone, then add the transport commands one at a time, and note exactly where the failure occurs.
USB timing conflicts cause more persistent problems than most producers assume. If several MIDI devices share a single USB hub alongside audio interfaces or other high-bandwidth peripherals, clock messages can be delayed in the queue. Move your MIDI interface to its own direct USB port on the computer, not a hub, and see if the problem disappears. If it does, you’ve found your bottleneck.
Firmware mismatches are another overlooked cause. Hardware synths and drum machines that haven’t been updated in years sometimes handle Song Position Pointer inconsistently, jumping to the wrong bar or ignoring the message entirely. Check the manufacturer’s site for firmware updates before assuming a cabling problem.
Ground loop noise, while rare, can corrupt MIDI data over long DIN cable runs, especially in venues with inconsistent power. If a device intermittently drops sync only in certain rooms or stages, a MIDI isolator can rule this out.
Finally, when nothing else explains a persistent glitch, swap one variable at a time: cable, then port, then device firmware, then interface. Changing multiple things simultaneously makes it impossible to isolate the actual cause later.
Using MIDI Clock With Tempo Changes and Automation
Tempo automation is where MIDI clock sync is tested most rigorously, because every connected device has to track a moving target in real time rather than a fixed number.
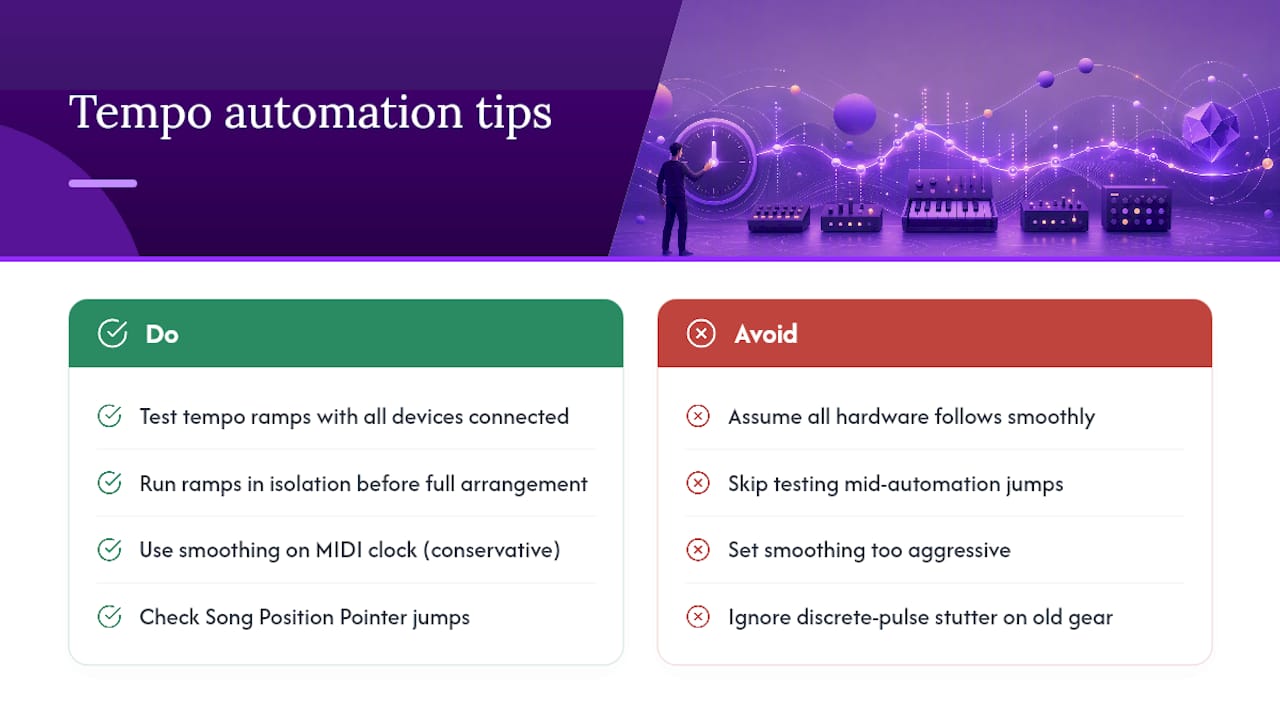
When your DAW’s tempo track ramps from 120 to 140 BPM over eight bars, it sends clock pulses at a proportionally increasing rate throughout that ramp. Slaved hardware follows along, but how smoothly it follows depends heavily on how that hardware processes incoming clock. Some older synths or drum machines interpret each pulse discretely and can stutter slightly during fast tempo changes. This is exactly where smoothing controls, like those in Renoise’s MIDI clock settings, earn their keep: they average out small pulse-to-pulse timing variations so that a tempo ramp feels continuous rather than stepped.
Automated tempo changes also interact with Song Position Pointer in ways worth understanding. If you jump to a different section mid-automation, some devices recalculate their internal tempo tracking cleanly, while others briefly play at the wrong speed until the next clock pulse corrects them. Testing any tempo-automated section with all your slaved devices connected before a show or session that depends on it catches this early.
For sequenced arpeggios or clock-synced delay effects, tempo automation can produce genuinely creative results, speeding up or slowing down rhythmic patterns in ways a static tempo never could. If you’re experimenting with clock-synced modulation effects, techniques like tape-style pitch bending with delay show how tempo-locked effects respond to exactly this kind of automation.
The practical rule: test tempo ramps in isolation before layering them into a full arrangement, and keep smoothing settings slightly more conservative than you think you need.
Integrating MIDI Clock Sync With Word Clock
MIDI clock and word clock solve two entirely different synchronization problems, and conflating them causes confusion in hybrid studio setups. MIDI clock synchronizes musical tempo and transport across MIDI devices. Word clock synchronizes the digital audio sample rate across audio interfaces, converters, and digital mixers, keeping every device sampling audio at exactly the same moment.
A studio running both MIDI-synced hardware synths and multiple digital audio converters needs both systems working correctly, but they don’t need to reference each other directly. Your audio interface should have one clear word clock master, usually the interface itself or a dedicated clock generator, with every other digital audio device set to slave to it. Separately, your DAW or master clock device handles MIDI timing independently.
Problems arise when producers assume fixing one fixes the other. Audio dropouts, clicks, or pops during recording point to a word clock issue, not a MIDI clock problem, even though both can produce timing-related symptoms that sound superficially similar. If your MIDI-synced sequences play in perfect tempo but your recorded audio has intermittent clicks, check your audio interface’s clock source setting before touching any MIDI configuration.
The two systems do intersect in one practical sense: sample-accurate MIDI-to-audio alignment, such as recording a hardware synth’s audio output while it’s also receiving a MIDI clock, requires both systems to be stable at the same time. If either drifts, the recorded take won’t align with your programmed MIDI part during playback. Running both systems on the same interface, rather than splitting MIDI and audio across separate boxes, usually simplifies this considerably.
Software Tools for Monitoring MIDI Clock Signals
Diagnosing a sync problem blind wastes time. A handful of monitoring approaches let you actually see what’s happening on the wire instead of guessing.
Most DAWs include a basic MIDI activity monitor, usually a small indicator light or meter, that shows whether clock messages are actually being transmitted and received on a given port. This is the fastest first check: if the indicator isn’t flickering at all, the problem is upstream of any offset or smoothing setting.
Dedicated MIDI monitoring utilities go further, logging every message type (including individual clock pulses, Start, Stop, Continue, and SPP jumps) with timestamps. These logs are invaluable when you suspect intermittent drops rather than a total failure, since you can scroll back and see exactly where the gap occurred.
Some interfaces ship with proprietary control panel software that displays clock stability graphically, showing jitter as a visual waveform rather than an abstract number. That kind of visualization makes it much easier to spot the difference between an acceptable, tiny timing variance and a genuine problem worth chasing down.
For a lower-tech but surprisingly effective option, a simple audio recording of your master and slave metronome clicks, viewed as a waveform in your DAW’s editor, shows drift visually over time. If the clicks stay perfectly aligned for the first sixteen bars and then start separating, you’ve isolated both the problem and roughly when it starts, which narrows your troubleshooting considerably.
The Editorial Take: What Actually Matters in MIDI Clock Sync
Most guides treat MIDI clock sync as a checklist problem: connect the cables, flip the switches, done. That framing undersells how much of this is really about failure planning rather than configuration. The protocol itself — 24 PPQN, Start/Stop/Continue, Song Position Pointer — is not the hard part. The hard part is what happens when one link in that chain drops, and whether your rig recovers gracefully or grinds to a halt mid-performance.
The conventional advice leans heavily on getting the initial setup right and stops there. That’s backward for live use. A studio session that drifts can be paused and fixed. A live set that drifts mid-song cannot. Prioritize failover thinking over perfect calibration: know which device becomes master if your primary fails, and test that scenario before you need it, not during a soundcheck five minutes before doors open.
Where a DAW earns its place as master isn’t raw stability. It’s recall. Saving a template that remembers your offsets, port assignments, and clock routing turns a fifteen-minute rebuild into a five-second load, and that difference compounds every time you reuse a rig.
— Wake
Try SoundBridge for MIDI-Clock-Centered Sessions
SoundBridge gives you native multi-port MIDI routing and zero-latency remote tracking in one workspace, so acting as your session’s clock master doesn’t mean bolting on separate utility software or juggling third-party monitors. Every offset, port assignment, and sync setting is saved directly to your project template, ready to reload the next time you plug in the same rig.

If you’re weighing whether a DAW can genuinely anchor a hardware-heavy setup, the guide to digital audio workstations breaks down exactly what to look for in routing, latency, and collaboration features. Start a session, wire up your first slaved device, and see how quickly a saved template gets you back to a working sync state next time.
Sources
Recommended
MASTER MUSIC PRODUCTION
Expert-led courses designed to take you from fundamentals to finished tracks.

HOUSEFrom bouncy bass and solid kicks, this course teaches you the most modern House music production techniques needed to succeed and stand out.

TRAPQuit sounding like generic Trap and produce something World with hints of the Far East. Create ethnic soundscapes to put your Trap ahead of the curve.

AMBIENTProduce relaxing, sophisticated psy-influenced ambient. Psychedelic and relaxing to listen to, create meditative soundscapes to put your listeners in Zen.