

Finish 40 Projects in a Year: Music Production Roadmap for Beginners
Last Edited: Sep 7, 2026
The fastest path to becoming a music producer runs through five stages in order: pick a DAW and commit to it; finish simple tracks before you chase complexity; learn arrangement; master mixing fundamentals; then iterate with tighter feedback loops. Skip the gear research and skip hopping between software. Finishing dozens of small, imperfect tracks builds skill faster than any tutorial marathon, and tools like SoundBridge exist specifically to remove friction from that repetition.
TL;DR:
- Finishing dozens of small projects builds more skill than endless tutorials, with the main focus on completing a high volume of simple tracks.
- Starting with basic projects that develop your workflow, arrangement, and sound design keeps learning steady and prevents gear obsession or DAW switching.
- Practice gain staging, EQ, and compression in order, maintaining headroom and targeting specific problems to ensure mixes translate well across playback systems.
- Regularly analyze professional tracks to improve critical listening skills, aiding sound design, mixing, and mastering accuracy without relying heavily on plugins.
- Consistent project archiving and collaboration at early stages amplify progress, making finishing one track per week achievable and preventing early perfectionism delays.
What Does a Music Production Roadmap Look Like Step by Step?
A working roadmap isn’t a list of skills to memorize. It’s a sequence of finished projects, each one slightly harder than the last, organized into rounds that build on each other. Think of it less like a syllabus and more like a training block for an athlete: repetition with rising difficulty, checkpoints instead of grades.
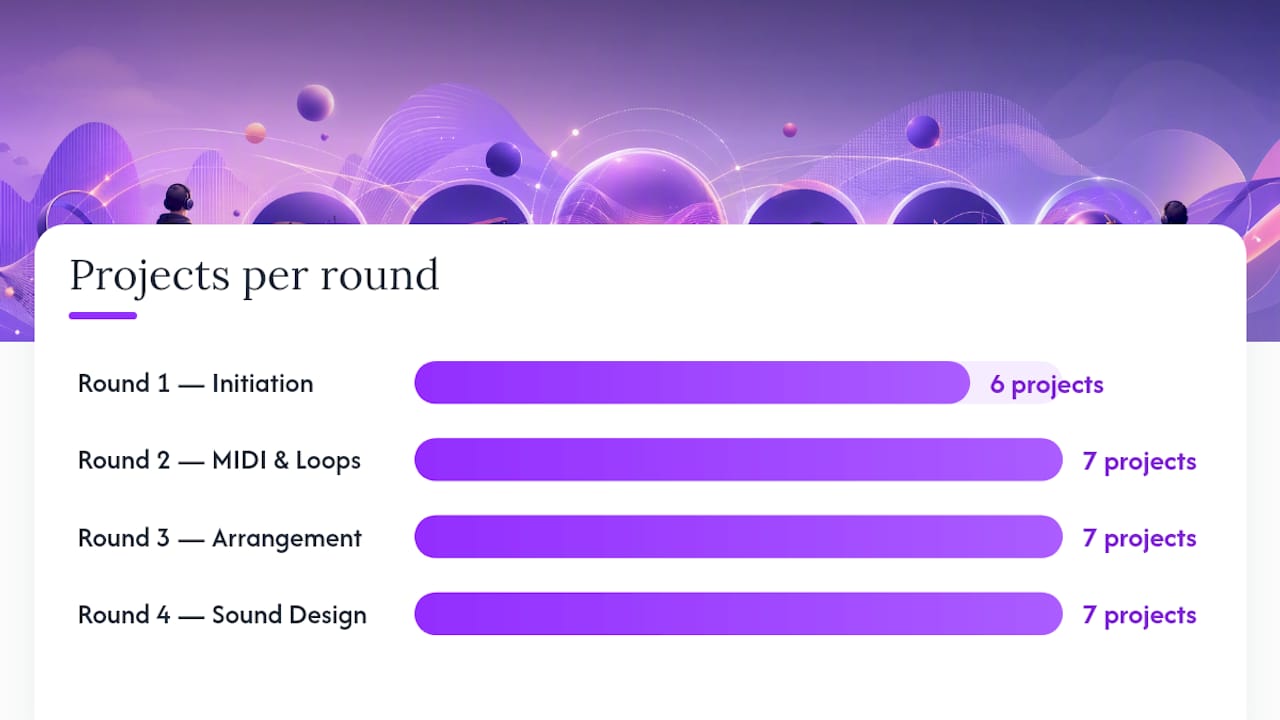
Here’s how to structure that sequence across roughly 40 practice projects, divided into six rounds. Each round has a theme, a handful of example projects, and a checkpoint that tells you whether you’re ready to move on.
Round 1: Initiation (Projects 1 to 6). Goal: get comfortable finishing something, anything, inside your DAW without overthinking it.
- Recreate a simple four-bar drum loop from a reference track by ear.
- Build a 30-second beat using only stock drum samples.
- Chop and rearrange a vocal sample into a new short phrase.
- Finish a 1-minute lo-fi loop with no more than four tracks.
- Record a short instrument or vocal take and clean it up.
- Export and listen to all five projects back-to-back on different speakers.
Checkpoint: you can open a blank session, add tracks, and export a finished audio file in under an hour.
Round 2: MIDI and Loops (Projects 7 to 13). Goal: get fluent with MIDI programming, quantization, and groove.
- Program a basic hip-hop beat using MIDI drum patterns.
- Write a simple bassline that locks to the kick.
- Build a chord progression using a piano roll and a soft synth.
- Layer a melody over an existing loop pack.
- Practice humanizing a MIDI drum pattern so it doesn’t sound robotic.
- Recreate the groove (not the notes) of a reference track.
- Finish a 90-second, loop-based track that combines everything above.
Checkpoint: your MIDI parts groove without needing heavy quantization to sound tight.
Round 3: Arrangement (Projects 14 to 20). Goal: turn loops into songs with structure, tension, and release.
- Take a Round 2 loop and build a full intro, verse, and chorus structure.
- Write a track with a clear buildup and drop or breakdown.
- Practice arranging the same loop three different ways.
- Add automation to create movement across an 8-bar section.
- Finish a 2 to 3 minute track with at least four distinct sections.
- Study the arrangement of a favorite song and map its structure on paper.
- Rebuild that structure using your own sounds.
Checkpoint: a stranger can hum back the shape of your track after one listen.
Round 4: Sound Design (Projects 21 to 27). Goal: stop relying entirely on presets and start shaping your own sounds.
- Design a bass patch from scratch using subtractive synthesis.
- Build a pad sound using layered oscillators and slow attack.
- Design a kick drum by layering a sub sine with a transient click.
- Create a riser or sweep effect using automation and filters.
- Recreate a signature sound from a genre you like (a bouncy bass, an ethnic soundscape, whatever pulls you).
- Design three variations of the same synth patch for different moods.
- Finish a track that leans on your own sound design instead of presets.
Checkpoint: you can describe, in plain language, what a filter cutoff or an LFO does to a sound before you touch the knob.
Round 5: Mix Basics (Projects 28 to 34) Goal: apply gain staging, EQ, and compression with intent, not guesswork.
- Take an old project and rebalance levels using gain staging alone.
- Practice subtractive EQ on a muddy bass and kick together.
- Compress a vocal or lead using three different ratio settings and compare.
- Mix a track using only EQ, compression, and volume—no effects.
- A/B your mix against a professional reference track at matched loudness.
- Fix a specific problem: a boxy midrange, a harsh cymbal, a buried vocal.
- Remix one of your Round 3 arrangement projects with proper gain staging.
Checkpoint: your mix translates reasonably well on headphones, laptop speakers, and a car stereo.
Round 6: Advanced Mix and Mastering (Projects 35 to 40). Goal: finish tracks that sound competitive and ready to release.
- Build a full mix bus chain with compression and light saturation.
- Practice mid-side EQ to widen a mix without losing focus.
- Master a finished track to a target loudness using a limiter.
- Compare your master against a commercial reference at matched volume.
- Finish and master an entire original track from scratch, start to end.
- Package the finished track with stems, in preparation for release.
Checkpoint: you’d be comfortable sending this track to a stranger, or a label, without a disclaimer.
For pacing, an intensive learner tackling one project per week finishes the full 40-project arc in about ten months. A part-time schedule of one project per month stretches that to roughly three years, which is completely fine. Berklee’s own Music Production 101 curriculum follows this same logic: home studio setup, DAW workflow, MIDI, arranging, and mixing basics, staged in that order because each skill depends on the one before it.
Pro Tip: Don’t wait until a project is “good” to finish it. The goal of Rounds 1 through 3 is reps, not quality. Quality shows up in Round 5 once you have thirty finished tracks to compare against.
The Five Fundamentals Every Producer Needs to Practice
Every roadmap project above draws from the same five skill categories. The University of Miami’s breakdown of how producers actually develop names these as workspace setup, sound design, arrangement, mixing, and mastering, and treats them as sequential rather than parallel.
- Workspace and DAW fluency: know your keyboard shortcuts, routing, and session setup well enough that the software disappears and you’re just making decisions about sound.
- Sound design: understand subtractive synthesis, layering, and how filters and envelopes shape a sound before you touch a preset browser.
- Arrangement: practice building tension and release across a full track length, not just looping an 8-bar idea forever.
- Mixing: apply gain staging, EQ, and compression with a specific problem in mind, never as a blanket “make it sound better” pass.
- Mastering: learn to hit a target loudness and translate your mix across playback systems without destroying dynamics.
For each fundamental, set a minimum bar before moving forward. You don’t need to master sound design before touching arrangement. You need enough sound design competence that your Round 3 arrangement projects don’t sound thin. That’s the difference between a roadmap and a checklist: skills unlock each other instead of stacking in isolation.
Pro Tip: Time-box your sound design practice to 20 minutes before every arrangement session. Constraints force decisions, and decisions are what finish tracks.
Which DAW Should You Choose, and What Gear Do You Actually Need?
The DAW you pick matters less than how fast you learn to stop thinking about it. Miami’s producer guide makes this point directly: beginners waste more time comparing software than they’d ever lose to a mediocre feature set. Pick one, commit for at least three months, and only reconsider once you’ve finished ten projects in it.
A minimal starter kit looks like this:
- A computer that can run modern software without constant crashes.
- One DAW, free tier or entry license, with a clean interface you’re willing to learn deeply.
- A decent pair of closed-back headphones for detail work.
That’s genuinely enough to finish Rounds 1 and 2 of the roadmap. MusicTech’s beginner guide makes the same case: full tracks come out of bedroom setups all the time, and buying gear before you hit a wall is money spent solving a problem you don’t have yet.
Add gear only when a specific task demands it:
- Audio interface: buy one the moment you need to record a real instrument or vocal, not before.
- Microphone: same trigger. If every sound in your track is coming from inside the DAW, you don’t need one yet.
- Studio monitors: worth adding once your mixes need to translate beyond headphones, typically around Round 5.
Session hygiene matters more than gear at this stage. Set your project sample rate once (44.1kHz is standard for most releases) and stop changing it. Name tracks by instrument, not “Audio 1,” and save incremental versions (v1, v2, v3) instead of overwriting your only copy. SoundBridge’s guide to essential DAW features walks through routing and workflow setup that apply regardless of which software you use. If you want a broader primer on room setup and gear sequencing, MusicStreet’s home studio guide covers the physical side well.
How Do You Build a Practice Routine That Actually Sticks?
The habit that separates producers who improve from producers who stall is simple: finish the track. Not perfect it. Finish it. A 1% improvement rule applies here: each project only needs to be marginally better than the last one, not a masterpiece.
A weekly practice loop that works:
- Learn one specific technique (a compression setting, an arrangement trick, a synthesis method).
- Apply it inside a new short project, ignoring everything else that’s imperfect.
- Finish the project and export it, even if it’s rough.
- Review it against your last three finished tracks, and against one professional reference.
- Repeat with the next technique on your list.
Mix short skill drills of 20 to 60 minutes with longer sessions where completion, not polish, is the only goal. Both matter, but they’re different muscles.
Three traps derail this loop fast: tutorial paralysis (watching instead of making), DAW switching (chasing a feature instead of finishing in the one you know), and overbuying gear before a real task requires it.
Pro Tip: Keep a dated folder of every finished project, no matter how rough. Six months from now, that archive is the clearest evidence you have that the roadmap is working.
What Are the Core Mixing and Mastering Steps for Beginners?
Mix in this order: gain staging, then EQ, then compression, then time-based effects like reverb and delay. Sonura Studio’s beginner roadmap backs this sequence specifically because each stage depends on the one before it. EQ decisions made before gain staging get thrown out the moment you fix your levels.
- Gain staging: set each track so peaks sit between -12 and -18 dB before any processing. This leaves headroom for the effects you’ll add next.
- EQ: cut before you boost. Find the frequency that makes a sound muddy or harsh, and remove it rather than boosting everything else to compensate.
- Compression: start with a moderate ratio (around 3:1 to 4:1) and adjust the threshold until you hear the loudest peaks tamed, not squashed flat.
- Reference tracks: A/B your rough mix against a commercial reference at matched volume, since ears adjust to loudness and trick you into thinking louder means better.
Sonura Studio’s roadmap notes that leaving headroom for mastering is one of the most commonly skipped steps among beginners, and it’s why many home mixes sound flat once they hit a streaming platform’s loudness normalization.
For mastering, a basic beginner checklist covers: a gentle mix bus compressor, light EQ correction if the whole mix leans dull or harsh, a limiter to hit a target loudness, and a final A/B against your reference. Outsource mastering once you’re releasing music you’re proud of and want a second set of ears. DIY master everything before that, since the practice reps matter more than the polish. SoundBridge’s step-by-step mixing guide walks through the same order in more detail at each stage.
How Do You Set Up Templates That Keep Your Sessions Moving?
A starter template should include pre-built drum, bass, and synth buses, a couple of send effects (reverb and delay) ready to go, an empty track loaded with your favorite reference track, and a “v1” save already in place before you write a single note. MusicRadar’s workflow guide makes the case plainly: a consistent session structure turns ideas into finished tracks faster because you’re not rebuilding your routing every time inspiration hits.
- Name and date every session file (for example, “Round3_Project17_v2”) so your archive stays searchable months later.
- Back up your project folder weekly, not just when you remember.
- Save incremental versions during a session instead of overwriting your only file, so a bad edit never costs you the whole track.
- Build a small library of channel-strip presets for drums, bass, and vocals as you finish more projects, since each mix teaches you a starting point worth reusing.
That last habit compounds. By Round 4 or 5, you’ll have five or six go-to starting points that cut your setup time in half.
How Do You Turn Finished Tracks Into Releases?
A finished track isn’t the finish line. It’s raw material for a portfolio, a release, or a collaboration pitch. The Native Instruments beginner guide frames this as the natural next step after the basics of mixing and mastering: distribution and promotion complete the loop that songwriting and studio setup started.
A minimum viable release checklist:
- Export final stems and a full mixdown, both at your target sample rate.
- Fill in metadata (title, artist, genre, release date) accurately before distribution.
- Commission or design simple cover artwork, even a clean, minimal one.
- Pick a distributor and submit with enough lead time, typically two to four weeks before your target release date.
Your archive of finished tracks from Round 1 through Round 6 doubles as a portfolio. When you reach out to a vocalist, another producer, or a small label, sending three finished tracks says more than any line on a resume.
- Post short clips of finished work consistently on social platforms rather than one polished drop every few months.
- Build a simple artist page or link-in-bio hub so new listeners have one place to find everything.
- Research playlist curators in your genre and pitch politely, with a direct link and a one-line description, not a wall of text.
How Does SoundBridge Support This Roadmap?
A roadmap only works if your tools stay out of the way. SoundBridge’s free tier gives you enough room to work through Rounds 1 and 2 without hitting a paywall mid-project, and its built-in templates mean you’re not rebuilding a session from scratch every time.
- Zero-latency remote tracking for Round 6 projects where you’re collaborating on a mix with another producer in real time.
- Bi-directional plugin and hardware control for sound design rounds when you want your studio gear to talk directly to your session.
- 192 kHz high-fidelity processing for advanced mixing and mastering work, once your ears are ready to hear the difference.
- Cloud collaboration with studio-accurate sync, useful once you start trading stems with other producers for feedback rounds.
For a deeper look at how a DAW’s feature set maps to a beginner’s actual needs, SoundBridge’s guide on essential audio editing techniques is a practical companion to Rounds 4 and 5 above.
Do You Need Music Theory to Produce Music?
You don’t need a music degree, but you need enough theory to make deliberate decisions instead of lucky ones. Three concepts cover most of what a beginner needs: scales, chord progressions, and rhythm subdivision.
Scales tell you which notes sound “in key” together, which matters the moment you’re writing a bassline under a chord progression. Major scales sound bright and resolved; minor scales sound darker and more tense, which is why so much electronic and hip-hop production leans minor. Chord progressions give your arrangement emotional shape. A simple four-chord loop (the kind behind hundreds of pop and House records) works because it sets up tension and resolves it, over and over, in a way your ear finds satisfying.
Rhythm subdivision (understanding eighth notes, sixteenth notes, and swing) is what separates a groove that feels alive from one that feels mechanical. This connects directly to Round 2 of the roadmap: humanizing a MIDI pattern is really just applying subtle rhythmic theory by ear.
You don’t need to study theory in isolation. Apply it inside your projects. Write a bassline, then ask why it does or doesn’t sit well under your chords. That question teaches more than a textbook chapter.
How Do Genres Differ in Their Production Approach?
Every genre has a signature production fingerprint, and recognizing it speeds up your sound design and arrangement decisions enormously. House music leans on a steady four-on-the-floor kick, bouncy bass, and arrangement built around long, danceable builds. Trap production favors sparse, hard-hitting 808s, rapid hi-hat rolls, and space, letting silence do as much work as sound. Ambient and psy-influenced work flips the priority entirely: sound design and texture matter more than rhythm, creating meditative soundscapes that put the listener in a completely different headspace.
Study a genre’s production style before you try to write in it. Pull apart a reference track: where does the low end sit, how busy is the arrangement, how much space is left between elements? A House track and a Trap track can both be built in the same DAW with the same five fundamentals, but the priority order shifts completely. Recognizing that shift, rather than applying one mixing approach to every genre, is what separates a producer who sounds versatile from one who sounds like they only know one trick.
How Do You Collaborate and Network as a Producer?
Collaboration accelerates a roadmap that would otherwise take years to walk alone. Trading stems with another producer exposes gaps in your mixing you’d never catch by yourself, since a second pair of ears hears problems you’ve grown numb to.
Start small. Share a finished Round 3 or Round 4 project with one other producer and ask for specific feedback (not “does this sound good,” but “does the low end feel muddy to you”). Specific questions get specific, usable answers. Online producer communities, genre-specific Discord servers, and local studio meetups all work as entry points, but the real relationship builds once you’ve traded actual finished work, not just ideas.
Remote collaboration tools remove the geography problem entirely. A vocalist in another city can now track over your beat in real time instead of trading files back and forth for weeks. That shift changes who you can realistically work with, and it’s worth building into your Round 5 and 6 projects once your mixing is solid enough to support outside contributions.
Networking doesn’t require a persona or a pitch deck. It requires a folder of finished tracks you’re not embarrassed to share, and enough consistency that people remember your name from one interaction to the next.
Why Does Critical Listening Matter More Than Any Plugin?
Your ears are the actual instrument you’re training, and most beginners skip this training entirely in favor of chasing plugins. Critical listening means analyzing a reference track with intent: where the vocal sits in the stereo field, how compressed the drum bus is, and what’s happening in the low end below 100Hz.
Pick one professional track per genre you’re working in and listen to it on repeat, not passively, but with a specific question each time. In one session, focus only on the kick-bass relationship. Next session, focus only on how wide the mix feels. This targeted, repeated listening trains your ear far faster than trying to absorb everything about a mix in one pass.
A/B testing against that reference, at matched volume, belongs in every mixing and mastering project from Round 5 onward. Your ears will lie to you the moment volume levels differ, which is why matched-level comparison is not optional; it’s the only way an A/B test tells you the truth.
What Mistakes Do Most Beginner Producers Make?
The most common mistake is mixing too early and too loud. Beginners often add compression and effects before gain staging, which means every subsequent decision is built on a shaky foundation. Fix the levels first, always.
The second is chasing gear instead of finishing projects. A new plugin or synth feels like progress, but it rarely moves you forward the way a finished track does. The third is DAW hopping, switching software whenever a new one promises a shortcut, which resets your muscle memory and slows your workflow each time.
The fourth is skipping headroom before mastering, leaving no room for a limiter to do its job without clipping or distortion. And the fifth is comparing your Round 1 project to a professional’s twentieth album, an unfair standard that kills motivation faster than any technical mistake ever could.
Instructor Note: The Habit That Actually Moves the Needle
Every producer who improves fast shares one trait: they finish things. Not the best things, just things. A rough two-minute loop finished on a Tuesday teaches more than a “perfect” 30-second clip that never got exported.
If you can commit to one project a week, you’ll walk this entire roadmap in under a year. If part-time is the reality, one project a month still gets you there in three. Either pace works. Skipping the finish line doesn’t.
— Wake
Start Building Your Roadmap Inside a DAW Made for It
Every stage of this roadmap assumes you’re working inside software that keeps up with you instead of getting in your way. SoundBridge gives you that from Round 1: a free tier for your first practice projects, ready-made templates so you’re not rebuilding a session from scratch, and cloud collaboration for the moment you’re ready to trade stems with another producer.

You don’t need the paid tier to finish Rounds 1 through 3. Upgrade when you hit a real trigger, like needing zero-latency remote tracking for a Round 6 collaboration, or 192kHz processing once your mastering ear is trained enough to hear the difference. If you’re still deciding what a DAW should actually do for you, SoundBridge’s guide on what a digital audio workstation is breaks down the fundamentals before you commit. Start your first project today, and see how far one finished track can take you.
Sources
- How to become a music producer (University of Miami)
- Music Production 101 (Berklee Online)
- How to make music: the beginner’s guide (Native Instruments Blog)
- New to making tracks? Start here (MusicRadar)
Recommended
MASTER MUSIC PRODUCTION
Expert-led courses designed to take you from fundamentals to finished tracks.

HOUSEFrom bouncy bass and solid kicks, this course teaches you the most modern House music production techniques needed to succeed and stand out.

TRAPQuit sounding like generic Trap and produce something World with hints of the Far East. Create ethnic soundscapes to put your Trap ahead of the curve.

AMBIENTProduce relaxing, sophisticated psy-influenced ambient. Psychedelic and relaxing to listen to, create meditative soundscapes to put your listeners in Zen.