

Capture System Audio on macOS 14.2 and Windows, Keep Tracks Separate
Last Edited: Sep 20, 2026
The fastest fix depends on your operating system. On Windows, use WASAPI loopback or Stereo Mix inside your recorder. On macOS, use a desktop app with a “system audio” toggle, or a process tap on newer versions. Browser recorders only grab the active tab, and DRM-protected streams like Netflix or Spotify will record silence no matter what tool you pick.
TL;DR:
- Recording system audio on Windows is most reliable with WASAPI loopback, but Stereo Mix can still work on many machines if enabled.
- On macOS, capturing system audio typically requires installing virtual drivers like Soundflower or using process tap APIs in newer OS versions.
- Browser-based recorders only capture the active tab’s audio and cannot record DRM-protected streams like Netflix or Spotify, which remain silent regardless of the method.
- Mac permissions for Screen Recording and Microphone access are essential and may require app restarts after changes; silent recordings often stem from incorrect device routing.
- For professional editing, always record in WAV with separate microphone and system tracks, as desktop tools and full DAWs offer better flexibility than quick screen capture tools.
What’s the Best Way to Record System Audio?
Every method trades off ease of use against fidelity and flexibility, so the right pick depends on whether you’re grabbing a quick tutorial clip or building a multitrack session for a podcast.
- Desktop app with a system-audio toggle: The simplest route for most people. Loom’s desktop app, for instance, captures internal audio from any application once you flip on “Use system audio,” while the browser extension version is stuck recording just one tab. Low complexity, moderate fidelity, and it usually handles mic-plus-system capture without extra setup.
- OS-level loopback (WASAPI, process taps): Higher fidelity, more configuration. WASAPI loopback on Windows and process-tap APIs on macOS pull audio straight from the system mixer, so you get clean, high-resolution output with no re-encoding loss.
- Virtual audio drivers or aggregate devices: Tools like Soundflower-style drivers route system output into a virtual input your recorder can see. More setup, but it works on macOS versions that lack native process-tap support, and Audacity’s own documentation leans on this exact workaround.
- Browser or tab-only recorders: Zero install, zero fidelity guarantees. Fine for a quick screen-share clip, unreliable for anything you’d publish.
- Command-line or developer libraries: Tools like pysysaudio map directly to WASAPI or CoreAudio, giving programmers scriptable, repeatable capture for automated workflows.
If you need separate mic and system tracks for editing later, the desktop app and OS-loopback routes both handle it; see this workflow for live optræden for best practices. Browser tools generally don’t.
How Do You Record System Audio on Windows?
Windows gives you two native paths: WASAPI loopback, which is the modern, reliable option, and Stereo Mix, a legacy driver feature that still works on plenty of machines.
- Open your recorder and find the input device list. Audacity, OBS, and most dedicated recording apps list available devices in their settings menu.
- Select the WASAPI loopback option. In Audacity, switch the host to “Windows WASAPI,” then choose your speakers or headphones as the recording device instead of a microphone. This pulls whatever is playing on that output straight into your track.
- If WASAPI isn’t listed, enable Stereo Mix instead. Right-click the speaker icon in your taskbar, choose Sound Settings, then More Sound Settings, and look under the Recording tab. If Stereo Mix is hidden, right-click inside that panel and select “Show Disabled Devices,” then enable it and set it as default.
- Set your file format and sample rate. WAV at 44.1kHz or 48kHz keeps full fidelity for editing later; MP3 is fine for a quick voice memo but throws away detail you can’t get back.
- Run a 10-second test recording before your real session. Play something with clear audio cues and confirm the waveform actually moves.
Pro Tip: If your test recording comes back silent, check that the loopback device matches your actual default output. Windows sometimes reverts to a different speaker or headphone set after a driver update, and your recorder keeps listening to the old one.
Common fixes when things go wrong: update your audio driver through Device Manager, confirm the correct output is set as default in Sound Settings, and close any app that might be exclusively locking the audio device (some games and DAWs grab it aggressively).
How Do You Record System Audio on a Mac?
macOS has changed how this works more than once, so the right method depends heavily on which version you’re running.
- Check your macOS version first. On macOS 14.2 and later, apps can use AudioHardwareCreateProcessTap to capture audio from a specific process, and this method doesn’t require Screen Recording permission. On macOS 13.x, capture typically falls back to ScreenCaptureKit, which does require that permission.
- Try a desktop app’s built-in system-audio option first. Many modern recorders expose a simple “Use system audio” switch in settings. If your Mac prompts for Screen Recording access, grant it in System Settings under Privacy & Security, then restart the app. Permission changes rarely apply until the app relaunches.
- If no native option exists, install a virtual audio driver. Soundflower-style drivers create a virtual output device. Once installed, open Audio MIDI Setup, create a Multi-Output Device, and route it to both your speakers and the virtual driver simultaneously.
- Select the virtual driver as your recorder’s input. This lets you hear playback normally while your recording app captures the same signal.
- For mic and system audio together, record them as two separate tracks. Set your microphone as one input, and the virtual driver or process tap as the other. This keeps dialogue and background audio independently editable.
Pro Tip: Recording system audio and mic on separate tracks makes cleanup dramatically easier. You can adjust noise reduction on the mic track alone without touching the cleaner system audio underneath it.
Older versions of Audacity specifically call out that macOS needs a driver like Soundflower because there’s no built-in loopback path the way Windows offers with WASAPI.
What Can Browser Recorders and Online Tools Actually Capture?
Most browser extensions and online recorders only capture the tab you’re on, not your whole system. That’s a sandbox restriction, not a bug, and no amount of settings tweaking gets around it.
- Extensions like those found in the Chrome Web Store advertise support for formats such as MP3, WAV, and WebM but explicitly state that they only capture a single tab’s audio.
- Chrome tends to offer the broadest compatibility for these tools; Safari and Firefox often lack the same capture APIs.
- Streaming services intentionally block internal audio capture on DRM-protected content, and this is enforced at the platform level, not something an extension can bypass.
- Reach for a browser tool when you need a quick clip from one tab. Switch to a desktop recorder the moment you need multiple app sources, a full system mix, or anything longer than a few minutes.
Why Is My Recording Silent, and How Do You Fix It?
Run through this list before assuming your recorder is broken. Nine times out of ten, it’s a permission or routing issue, not a software failure.
- On macOS, confirm Screen Recording and Microphone permissions are both granted in System Settings, and remember that macOS 14.2’s process-tap method may skip the Screen Recording prompt entirely, while 13.x still requires it.
- On Windows, verify WASAPI loopback is pointed at your actual default output device, and check that Stereo Mix hasn’t gone hidden again after a driver update.
- Play something and watch the waveform. If it’s flat, the recorder isn’t listening to the right device, period.
- Check for a competing app holding the audio device exclusively. Some games and audio tools do this by default.
- DRM-protected streams will record silent no matter what you try. This isn’t a configuration problem; it’s enforced by the platform and the content provider, and there’s no workaround.
- Quick fixes that solve most issues: restart the recording app after granting any permission, update your audio drivers, and try switching sample rates if the file plays back distorted.
Developer documentation on system-level audio capture notes that some macOS permission changes require an explicit app restart before they take effect at all, which explains a surprising number of “it’s still not working” support tickets.
When Should You Move From a Quick Recorder to a Full DAW?
A quick recorder gets you the file. What you do with that file after is where the real craft starts, and that’s where a lot of creators sell themselves short.
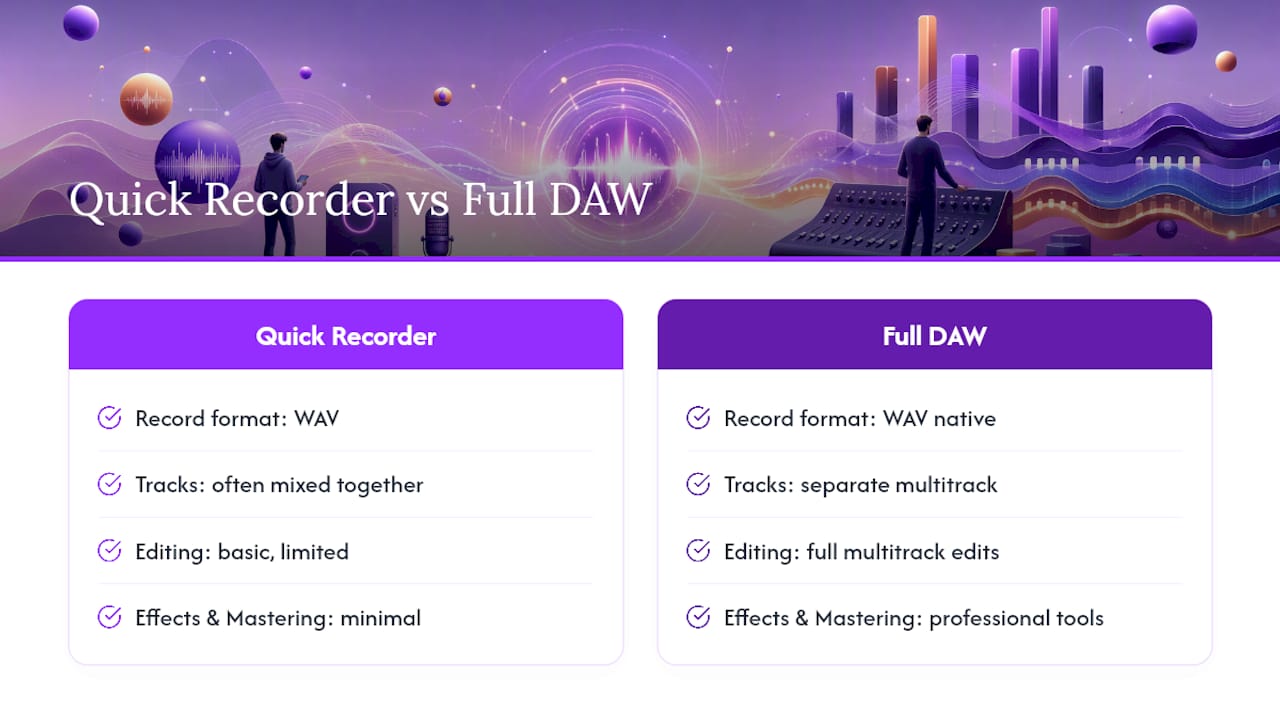
Record in WAV, not MP3, whenever the recording matters. Keep your system audio and microphone as separate tracks from the start, since that single habit saves hours later when you need to duke it out with background hum or match levels between a voiceover and a game clip. Separate tracks also make transcription and noise control far more forgiving, because you’re not trying to surgically remove one sound from a track that’s already fused it with another.
Once you’re past the “just capture it” stage, a basic recorder starts showing its limits fast. Editing multitrack sessions, layering effects, or collaborating with someone else on the mix calls for a real production workflow, not just another export button. That’s the point where a full DAW earns its place in the pipeline, particularly if your project ever needs remote collaborators or professional-grade mastering tools.
— Wake
Turn Your Recordings Into Finished Tracks With SoundBridge
Once you’ve got your system audio and mic captured as clean, separate files, SoundBridge picks up right where a quick recorder leaves off. It runs on desktop platforms, handles multitrack editing natively, and supports remote collaboration features for mixing projects with partners who aren’t in the same room.
[Image:cta_image]
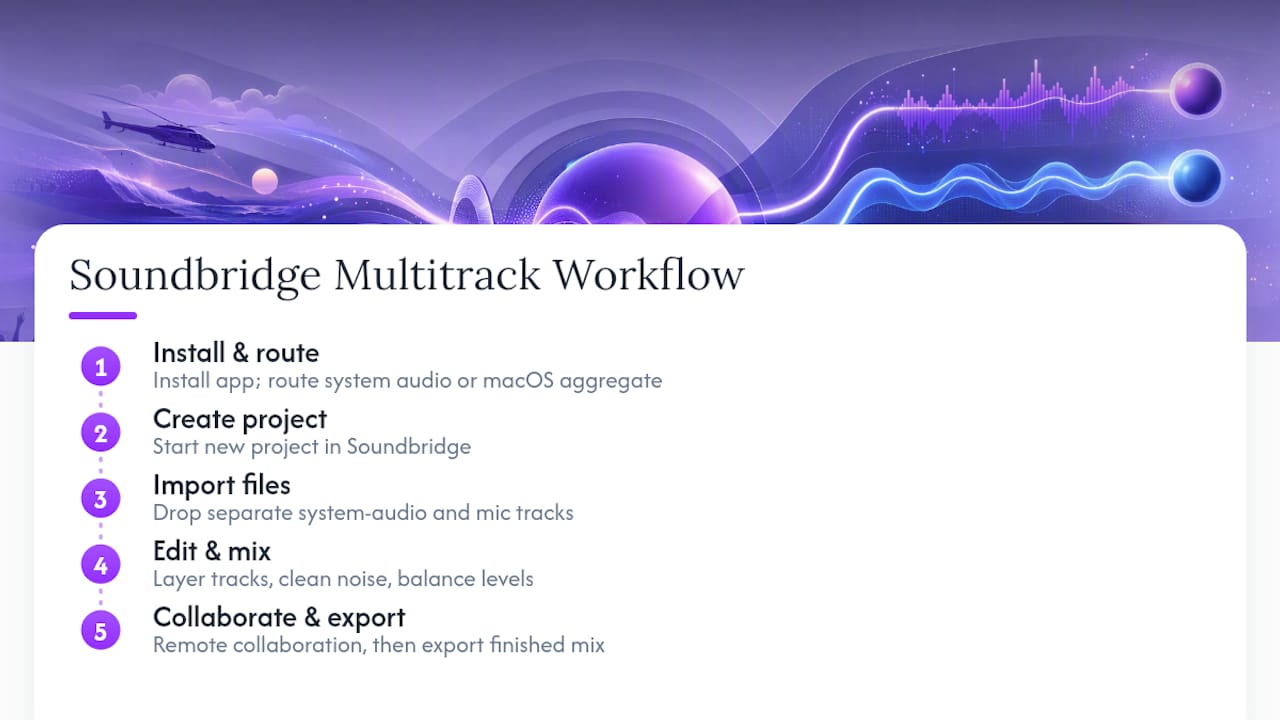
Getting started is simple: install SoundBridge, route your system audio (or set up your aggregate device on macOS the way you already did for your recorder), and drop the recorded files straight into a new project. From there, you can layer in audio-editing techniques built for producers, clean up noise, balance levels across tracks, and export a finished mix rather than a raw capture. If you’re weighing which platform best fits your setup, SoundBridge’s comparison of Mac and Windows workflows breaks down the trade-offs. When you’re ready to see what a full digital audio workstation can do with the files you just recorded, start a project on SoundBridge today.
Sources
- Capture internal audio / system audio | Loom | Atlassian Support
- Recording desktop audio
- crimson-knight/crystal-audio
- scottjg/pysysaudio
- Screen Record on Android With Internal Audio (No Root)
Recommended
MASTER MUSIC PRODUCTION
Expert-led courses designed to take you from fundamentals to finished tracks.

HOUSEFrom bouncy bass and solid kicks, this course teaches you the most modern House music production techniques needed to succeed and stand out.

TRAPQuit sounding like generic Trap and produce something World with hints of the Far East. Create ethnic soundscapes to put your Trap ahead of the curve.

AMBIENTProduce relaxing, sophisticated psy-influenced ambient. Psychedelic and relaxing to listen to, create meditative soundscapes to put your listeners in Zen.