SoundBridge Widgets: Edit Windows - Part 1
Last Edited: Oct 9, 2023
[et_pb_section fb_built="1" admin_label="section" _builder_version="3.22" _i="0" _address="0"][et_pb_row admin_label="row" _builder_version="3.25" background_size="initial" background_position="top_left" background_repeat="repeat" _i="0" _address="0.0"][et_pb_column type="4_4" _builder_version="3.25" custom_padding="|||" _i="0" _address="0.0.0" custom_padding__hover="|||"][et_pb_text admin_label="Text" _builder_version="3.29.3" background_size="initial" background_position="top_left" background_repeat="repeat" hover_enabled="0" _i="0" _address="0.0.0.0"]
The Edit Windows within the SoundBridge: DAW offer many options for Audio, MIDI, Automation and Crossfade editing. In the next tutorial, we will cover a significant amount of features and provide you with a better understanding of how they work.

 Regarding the “Stretch,” we should mention that there are four pitch stretch algorithms available. You can select them for every audio channel in the track list.


 Furthermore, if you want to make a cross-fade between the audio blocks, you will first have to merge them in the sequencer window. Then, the options provided will allow you to do so.

 [/et_pb_text][/et_pb_column][/et_pb_row][/et_pb_section]
Edit Window
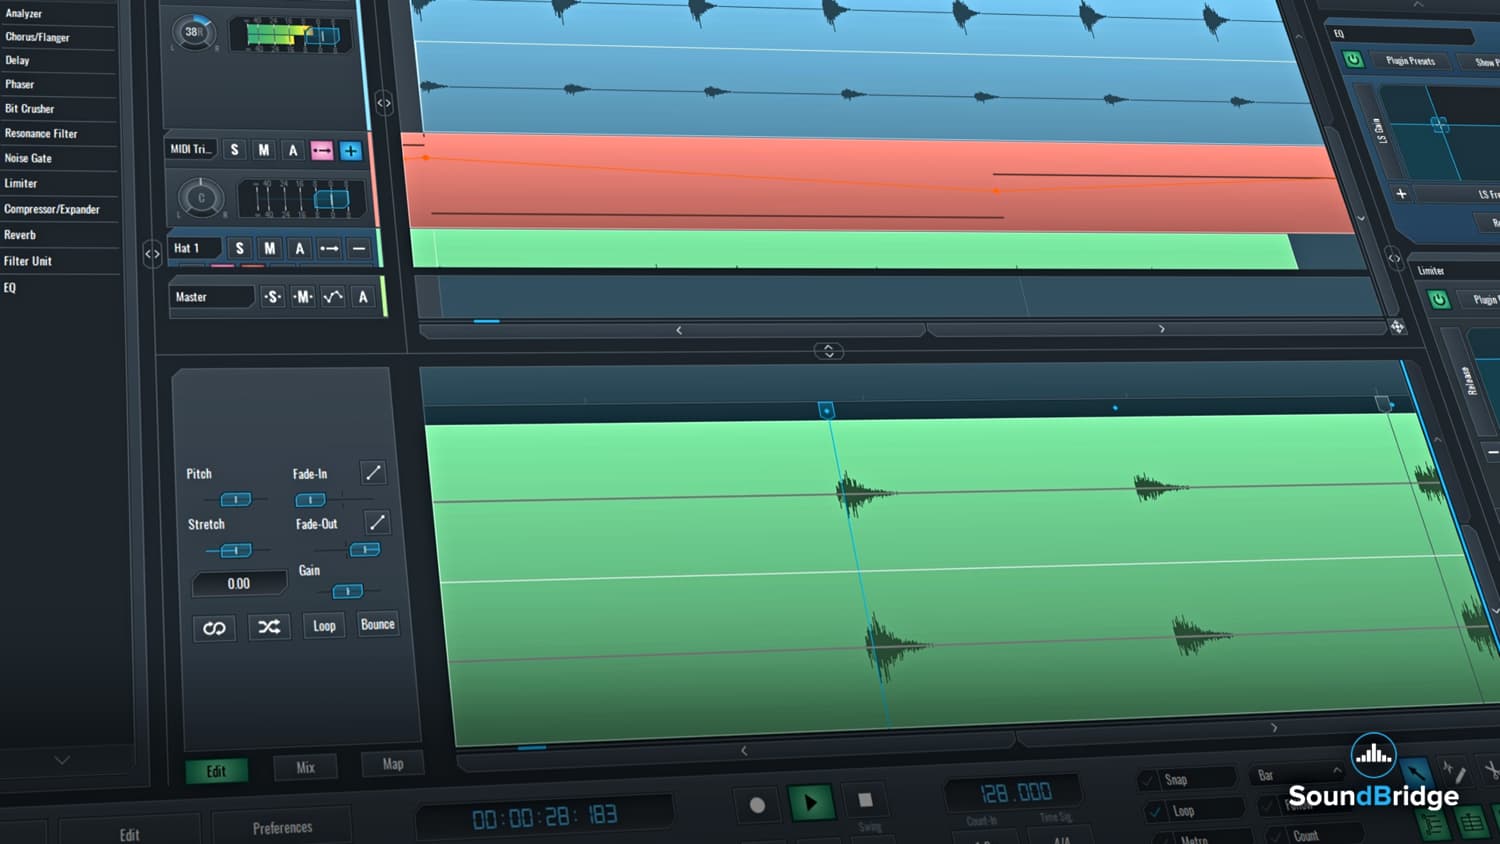
The Edit Window is located in the bottom of the SoundBridge: DAW interface, just above the Transport Bar as you can see from the picture below. You can open it by double-clicking on the element in the sequencer. It will allow you to edit the elements from your arrangement, cut and edit audio and write MIDI and automation blocks. Depending on the content of the block you opened, the editor will present you with different options for editing.
Pitch and Stretch
In case of editing an audio file, there are some additional controls. The “Pitch” is used to increase or decrease the audio up to 24 semitones by preserving its length. The “Stretch” slider will increase or decrease the speed of the audio block by preserving its pitch. It is possible to adjust “Stretch” by moving the blue stretch point at the end of the file.
Regarding the “Stretch,” we should mention that there are four pitch stretch algorithms available. You can select them for every audio channel in the track list.
Draw
You can use stretch points with the “Draw” tool. It is located within the “Transport Bar”. Also, you can move them with the “Select” tool. When using the “Snap to Beat” version of the “Draw” tool, if you double-click on the “Draw” tool, the stretch points will snap to beats. They will also snap to grid divisions if the snap is checked.
Fade In and Fade Out
The “Fade In” and “Fade out” faders increase or decrease the level of an audio signal. There is also an option to grab and drag dots at the beginning and end of the file. Above both of the fade sliders, you will find a toggle button that will allow you to chose a curve type for the fade. It can be linear, logarithmic, exponential or raised cosine.
Gain
The “Gain” slider will let you increase or decrease the gain of the audio up to 24 dB. You can also use the dots marked in red for that purpose.
Gain Automation
When engaged this button allows for gain automation to be written on top of the audio block. This automation is added on top of the gain control applied using the "Gain" slider.
Reverse and Invert
The buttons that you can see below the sliders are also useful part of this section. The first one called “Reverse” will render the audio between the left and right markers and reverse it so that it plays backward. The “Invert” button will invert the waveform and therefore change its polarity, making all the negative values in the signal positive and vice versa. It is a great feature for experimenting with different phases.Loop and Bounce
When enabled, the “Loop” button will repeat the audio between the left and right markers indefinitely. This is also a great feature for experimenting with the different phases of the elements in the mix. Finally, the “Bounce” button will render the audio between the left and right markers to a new audio block with all the changes you made in the editing window applied.
Furthermore, if you want to make a cross-fade between the audio blocks, you will first have to merge them in the sequencer window. Then, the options provided will allow you to do so.
Link and Merge
In the picture below you can see two crossfade selectors for the crossfade entrance and the crossfade exit. The “Link” button between them will link them together so that the change to the curve you make for one of them reflects on the other one. The “Merge” button, when enabled, will allow for the merged blocks to be resized or repositioned.Length
The “Length” button will allow you to adjust the length of the crossfade itself while maintaining the position of the blocks. You can do this by dragging the block that did the overlapping. Finally, the “Bounce” button will render the new audio block returning to the standard audio edit window.
[/et_pb_text][/et_pb_column][/et_pb_row][/et_pb_section]Education
MASTER MUSIC PRODUCTION
Expert-led courses designed to take you from fundamentals to finished tracks.

HOUSEFrom bouncy bass and solid kicks, this course teaches you the most modern House music production techniques needed to succeed and stand out.

TRAPQuit sounding like generic Trap and produce something World with hints of the Far East. Create ethnic soundscapes to put your Trap ahead of the curve.

AMBIENTProduce relaxing, sophisticated psy-influenced ambient. Psychedelic and relaxing to listen to, create meditative soundscapes to put your listeners in Zen.